
[置顶] 泰晓 RISC-V 实验箱,配套 30+ 讲嵌入式 Linux 系统开发公开课
解决 Linux 内核 Section GC 失败问题 - Part 1
Corrector: TinyCorrect v0.2-rc2 - [spaces] Author: Yuan Tan tanyuan@tinylab.org Date: 20230730 Revisor: Falcon falcon@tinylab.org Project: RISC-V Linux 内核剖析 Proposal: 通过编译器解决因链接过程 KEEP 操作引起的 Section GC 失败问题 Sponsor: PLCT Lab, ISCAS
概述
本文为 解决 Linux 内核 Section GC 失败问题 系列文章的一部分。
- Section GC 分析 - Part 1 原理简介
- Section GC 分析 - Part 2 gold 源码解析
- Section GC 分析 - Part 3 引用建立过程
- 解决 Linux 内核 Section GC 失败问题 - Part 1
- 解决 Linux 内核 Section GC 失败问题 - Part 2
前面几篇文章介绍了 Section GC 的使用方法和原理,现在我们来研究 Linux 内核中的 Section GC 失败问题。
链接器在开启 --gc-sections 选项后能够删除掉没有使用到的函数和变量,因为 ELF 文件格式中存储了函数和变量的引用,链接器能够建立节之间的依赖关系。如果一个函数或变量没有被其他函数引用,那么它就可以被删除。
这篇文章 详细介绍了引用的建立过程。
如果一个 section 建立的时候没有引用关系,那么它会成为孤儿 section,默认都会被 GC。可以使用链接器的 KEEP 指令来强制保留这样的 section。Linux Kernel 中有许多这样的 section。
但实际上,许多被强制保留的 section 是可以被 GC 的。是否可以手动为这些 section 创建引用,尽可能地裁剪掉无用代码呢?这一系列文章旨在解决这个问题。
.pushsection 基本用法
.pushsection 是一个汇编语言的 directive 之一,在内核中广泛使用。这种语法并不能建立引用关系。孤儿 section 主要由它建立。
下面是使用 .pushsection 的简单例子:
// example.c

void fun() {
  asm(".pushsection .rodata.test,\"a\"\n\t"
      ".string \"this_is_a_new_section\"\n\t"
      ".popsection\n");
}

int main() { fun(); }
编译时打开 -ffunction-sections 选项,将节存放在不同的区域,以便之后对其中的节进行删除。
下面查看这段代码编译后的汇编,来理解 .pushsection 的作用。
$ riscv64-linux-gnu-gcc -ffunction-sections example.c -S
$ cat example.s
        .file   "example.c"
        .option pic
        .text
        .section        .text.fun,"ax",@progbits
        .align  1
        .globl  fun
        .type   fun, @function
fun:
        addi    sp,sp,-16
        sd      s0,8(sp)
        addi    s0,sp,16
#APP
# 2 "example.c" 1
        .pushsection .rodata.test,"a"
        .string "this_is_a_new_section"
        .popsection

# 0 "" 2
#NO_APP
        nop
        ld      s0,8(sp)
        addi    sp,sp,16
        jr      ra
        .size   fun, .-fun
        .section        .text.main,"ax",@progbits
        .align  1
        .globl  main
        .type   main, @function
main:
        addi    sp,sp,-16
        sd      ra,8(sp)
        sd      s0,0(sp)
        addi    s0,sp,16
        call    fun
        li      a5,0
        mv      a0,a5
        ld      ra,8(sp)
        ld      s0,0(sp)
        addi    sp,sp,16
        jr      ra
        .size   main, .-main
        .ident  "GCC: (Ubuntu 11.4.0-1ubuntu1~22.04) 11.4.0"
        .section        .note.GNU-stack,"",@progbits
在编译一个 C 语言程序的时候,编译器进行一下几个步骤:
- 预处理(Preprocessing)阶段:展开 C 语言中的宏和 include
- 编译(Compilation)阶段:cc1 先将 C 语言转换成编译器 IR(Intermediate Representation),在 IR 阶段对程序进行各种优化,然后根据目标架构的汇编语法规则,转换成目标架构汇编
- 汇编(Assembly)阶段:汇编器将汇编代码翻译成机器代码,生成目标文件。目标文件是二进制文件,其中包含特定平台上的机器指令,但还没有链接到最终的可执行文件中。
- 链接(Linking)阶段:链接器将编译生成的目标文件与所需的库文件进行链接,解析符号引用,并创建最终的可执行文件。在这个阶段,所有的函数和变量引用都被解析为内存地址,生成一个完整的可执行文件。
最终的 ELF 可执行文件分为不同的 section,如代码节 .text、数据节 .data。编译阶段就已经划分好了这些节。
汇编器解析汇编,识别到 .pushsetion 的时候,会暂停当前 section 的处理,新建一个 section;当汇编器解析汇编语法识别到 .popsection 的时候,这个新增的 section 处理完毕,恢复处理之前暂停的 section。
查看 .o 文件的 Section Headers:
$ riscv64-linux-gnu-gcc -ffunction-sections example.c -c
$ riscv64-linux-gnu-readelf -S example.o
There are 14 section headers, starting at offset 0x310:

Section Headers:
  [Nr] Name              Type             Address           Offset
       Size              EntSize          Flags  Link  Info  Align
  [ 0]                   NULL             0000000000000000  00000000
       0000000000000000  0000000000000000           0     0     0
  [ 1] .text             PROGBITS         0000000000000000  00000040
       0000000000000000  0000000000000000  AX       0     0     2
  [ 2] .data             PROGBITS         0000000000000000  00000040
       0000000000000000  0000000000000000  WA       0     0     1
  [ 3] .bss              NOBITS           0000000000000000  00000040
       0000000000000000  0000000000000000  WA       0     0     1
  [ 4] .text.fun         PROGBITS         0000000000000000  00000040
       000000000000000e  0000000000000000  AX       0     0     2
  [ 5] .rodata.test      PROGBITS         0000000000000000  0000004e
       0000000000000016  0000000000000000   A       0     0     1
  [ 6] .text.main        PROGBITS         0000000000000000  00000064
       000000000000001c  0000000000000000  AX       0     0     2
  [ 7] .rela.text.main   RELA             0000000000000000  00000260
       0000000000000030  0000000000000018   I      11     6     8
  [ 8] .comment          PROGBITS         0000000000000000  00000080
       000000000000002c  0000000000000001  MS       0     0     1
  [ 9] .note.GNU-stack   PROGBITS         0000000000000000  000000ac
       0000000000000000  0000000000000000           0     0     1
  [10] .riscv.attributes RISCV_ATTRIBUTE  0000000000000000  000000ac
       0000000000000033  0000000000000000           0     0     1
  [11] .symtab           SYMTAB           0000000000000000  000000e0
       0000000000000168  0000000000000018          12    13     8
  [12] .strtab           STRTAB           0000000000000000  00000248
       0000000000000017  0000000000000000           0     0     1
  [13] .shstrtab         STRTAB           0000000000000000  00000290
       000000000000007e  0000000000000000           0     0     1
Key to Flags:
  W (write), A (alloc), X (execute), M (merge), S (strings), I (info),
  L (link order), O (extra OS processing required), G (group), T (TLS),
  C (compressed), x (unknown), o (OS specific), E (exclude),
  D (mbind), p (processor specific)
可以看到由 .pushsection 生成的 .rodata.test section。
编译 example.c,查看 .pushsection 在开启 --gc-sections 后的行为:
$ riscv64-linux-gnu-gcc -ffunction-sections  -Wl,--gc-sections,--print-gc-sections example.c
ld: removing unused section '.rodata.cst4' in file '/usr/riscv64-linux-gnu/usr/lib/Scrt1.o'
ld: removing unused section '.riscv.attributes' in file '/usr/lib/gcc/riscv64-linux-gnu/12.2.0/crti.o'
ld: removing unused section '.rodata.test' in file '/tmp/cceaBups.o'
ld: removing unused section '.riscv.attributes' in file '/usr/lib/gcc/riscv64-linux-gnu/12.2.0/crtn.o'
.rodata.test 节被删除了,它没有被任何节引用。
强制保留节的方法
一般情况下,如果函数 A 中有调用到函数 B,那么函数 A 就会引用函数 B,链接器垃圾回收时会遍历引用关系,来保留有被引用到的函数。但因为 .rodata.test 是 .pushsection 创建的,不会创建和其他函数的引用关系,那么它就会被垃圾回收掉。
这种错误的垃圾回收让程序不能正常运行。我们可以使用一些指令来强制保留 .pushsection 产生的节。内核中最常见的做法是在链接脚本中使用 KEEP。除此之外,还有其他方法可以强制保留节。
查看 as 的 文档,可以查看 .pushsection 和 .section 的定义。
.pushsection name [, subsection] [, "flags"[, @type[,arguments]]]
.section name [, "flags"[, @type[,flag_specific_arguments]]]
flags 中有一个符合我们的要求:
R
retained section (apply SHF_GNU_RETAIN to prevent linker garbage collection, GNU ELF extension)
使用该 flags 后,不需要在链接脚本中 KEEP,.pushsection 新建的 section 就能够在 GC 中保留。
示例代码:
.pushsection .rodata.test,"aR",@progbits
这种方式本质上和 KEEP 没有区别,无法删除无用的代码,但为接下来的研究提供了思路——工具链中可能存在一些选项来手动建立引用关系。
.pushsection 与强制保留带来的问题
上一小节提到的强制保留方法会造成一些问题,可以分两种情况讨论。
.pushsection产生的节不应该被保留仍被保留。 有一函数section_pusher()使用了.pushsection pushed_section来增加pushed_section节的数据。如果section_pusher()因为被 GC 删除,那么他创建的pushed_section自然不应该被其他地方使用到,但pushed_section仍然被强制保留。.pushsection中引用了section_pusher(),造成所属权反转,section_pusher()也被强制保留。
下面是情况 2 的一个例子:
// example2.c

void section_pusher() {
    asm("1: nop\n"
        ".pushsection pushed_section,\"aR\"\n\t"
        ".long		((1b) - .)\n\t"
        ".popsection\n");
}

int main() {
    return 0;
}
$ riscv64-linux-gnu-gcc -ffunction-sections -Wl,--gc-sections,--print-gc-sections example2.c
ld: removing unused section '.rodata.cst4' in file '/usr/lib/gcc-cross/riscv64-linux-gnu/11/../../../../riscv64-linux-gnu/lib/Scrt1.o'
ld: removing unused section '.riscv.attributes' in file '/usr/lib/gcc-cross/riscv64-linux-gnu/11/crti.o'
ld: removing unused section '.riscv.attributes' in file '/usr/lib/gcc-cross/riscv64-linux-gnu/11/crtn.o'
在 example2.c 中,.pushsection pushed_section,aR 使用 R flag 强制保留了 pushed_section。
.long ((1b) -.) 这是一个用于计算偏移量的指令。1b 是对先前定义的标记(label)的引用,表示 标记 1 的地址;. 表示当前位置的地址。因此,(1b) -. 将计算存在于 fun() 中的 标记 1 和当前位置之间的偏移量。
这里 pushed_section 引用了 section_pusher(),让 section_pusher() 成为了 pushed_section 的子节,形成了错误的依赖关系。不仅 pushed_section 会被强制保留,section_pusher() 也会被强制保留。
__ex_table 介绍
__ex_table 是一种用于处理异常的数据结构,异常表项是这样定义的:
// arch/riscv/include/asm/extable.h:18

struct exception_table_entry {
	int insn, fixup; // 会触发异常的指令地址的偏移量,异常处理的指令地址的偏移量
	short type, data;
};
异常表和异常向量表不同。处理器触发异常时在异常向量表中找到相应的异常处理程序。异常处理程序无法区分一些异常情况,于是使用异常表来完成。
关于异常表的更多详细解释可以查阅后文的参考文献:6、7、8。
__ex_table 属于刚刚的情况二,pushed_section 引用了 section_pusher()
__ex_table 的建立方式是这样定义的:
// arch/riscv/include/asm/asm-extable.h:14

#define __ASM_EXTABLE_RAW(insn, fixup, type, data)	\
	".pushsection	__ex_table, \"a\"\n"		\
	".balign	4\n"				\
	".long		((" insn ") - .)\n"		\
	".long		((" fixup ") - .)\n"		\
	".short		(" type ")\n"			\
	".short		(" data ")\n"			\
	".popsection\n"
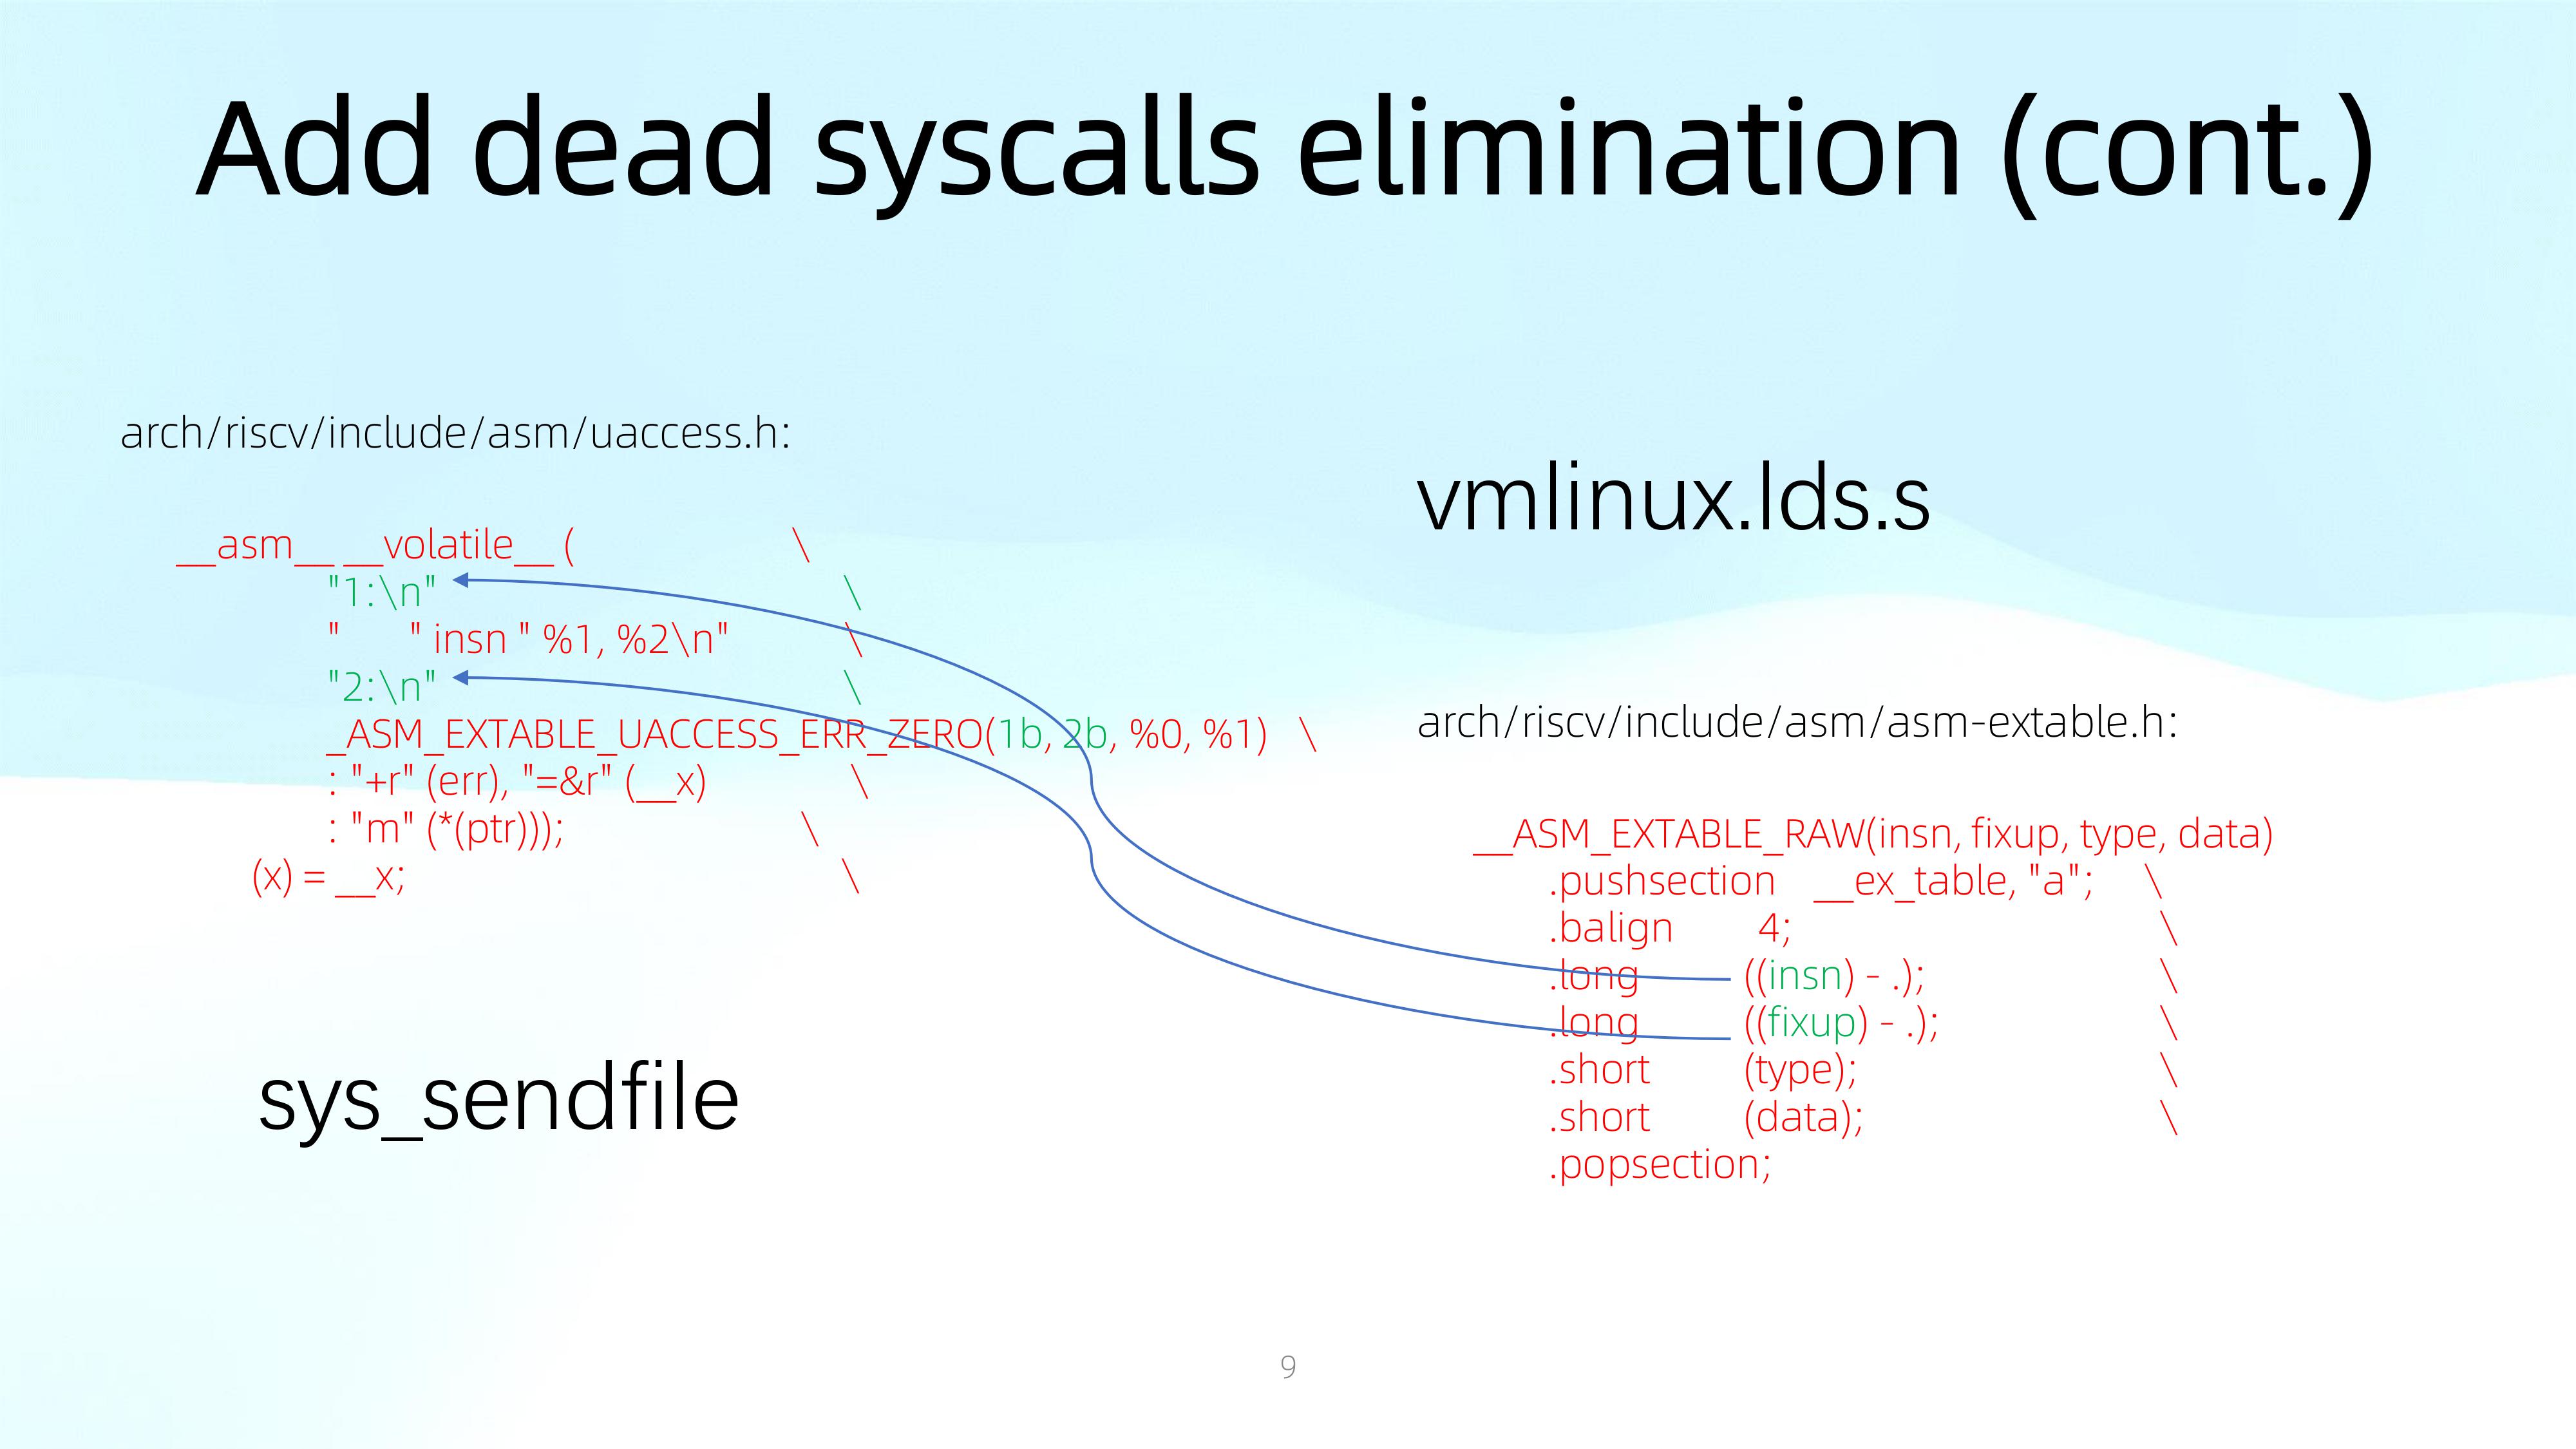
__ex_table 引用了父节的 insn, insn, fixup, type, data,让父节也被错误的保留。
总结
这篇文章介绍了 Section GC 失效的原理与 .pushsection,并给出了 Linux Kernel 中使用 .pushsection 的例子
接下来的几篇文章我们将探索为 .pushsection 建立正确引用关系的方法。
参考资料
猜你喜欢:
- 我要投稿:发表原创技术文章,收获福利、挚友与行业影响力
- 知识星球:独家 Linux 实战经验与技巧,订阅「Linux知识星球」
- 视频频道:泰晓学院,B 站,发布各类 Linux 视频课
- 开源小店:欢迎光临泰晓科技自营店,购物支持泰晓原创
- 技术交流:Linux 用户技术交流微信群,联系微信号:tinylab
| 支付宝打赏 ¥9.68元 | 微信打赏 ¥9.68元 | |
 |  请作者喝杯咖啡吧 |  |
Read Album:
- Stratovirt 的 RISC-V 虚拟化支持(六):PLIC 和 串口支持
- Stratovirt 的 RISC-V 虚拟化支持(五):BootLoader 和设备树
- Stratovirt 的 RISC-V 虚拟化支持(四):内存模型和 CPU 模型
- Stratovirt 的 RISC-V 虚拟化支持(三):KVM 模型
- Stratovirt 的 RISC-V 虚拟化支持(二):库的 RISC-V 适配