[置顶] 泰晓 RISC-V 实验箱,配套 30+ 讲嵌入式 Linux 系统开发公开课
Network Namespace 详解
By pwl999 of [TinyLab.org][1] Mar 23, 2021
简介
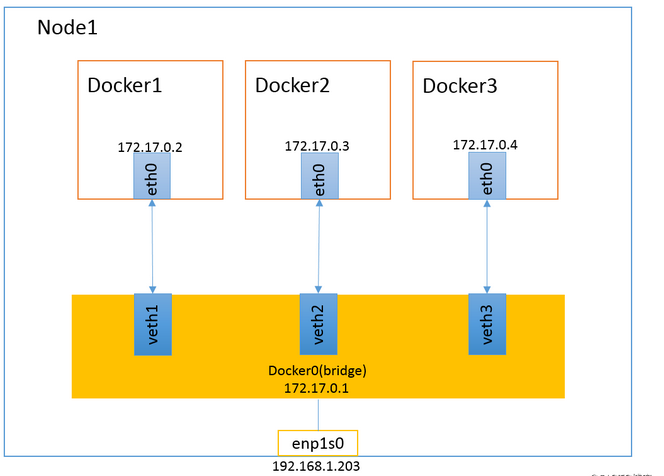
Docker Network 桥接模式配置

1、创建一个新的 bash 运行在新的 net namespace 中:
pwl@ubuntu:~$ sudo unshare --net /bin/bash
[sudo] password for pwl:
root@ubuntu:~# ll /proc/$$/ns
total 0
dr-x--x--x 2 root root 0 3月   7 17:34 ./
dr-xr-xr-x 9 root root 0 3月   7 17:34 ../
lrwxrwxrwx 1 root root 0 3月   7 17:34 cgroup -> 'cgroup:[4026531835]'
lrwxrwxrwx 1 root root 0 3月   7 17:34 ipc -> 'ipc:[4026531839]'
lrwxrwxrwx 1 root root 0 3月   7 17:34 mnt -> 'mnt:[4026531840]'
lrwxrwxrwx 1 root root 0 3月   7 17:34 net -> 'net:[4026532598]'
lrwxrwxrwx 1 root root 0 3月   7 17:34 pid -> 'pid:[4026531836]'
lrwxrwxrwx 1 root root 0 3月   7 17:34 pid_for_children -> 'pid:[4026531836]'
lrwxrwxrwx 1 root root 0 3月   7 17:34 user -> 'user:[4026531837]'
lrwxrwxrwx 1 root root 0 3月   7 17:34 uts -> 'uts:[4026531838]'
root@ubuntu:~# echo $$
6700
2、需要将新的 net namespace 在 /var/run/netns 文件夹下创建一个链接,才能被 ip netns 命令识别到:
pwl@ubuntu:~$ ip netns show
pwl@ubuntu:~$ sudo mkdir /var/run/netns
[sudo] password for pwl:
pwl@ubuntu:~$ ln -s /proc/6700/ns/net /var/run/netns/4026532598
ln: failed to create symbolic link '/var/run/netns/4026532598': Permission denied
pwl@ubuntu:~$ sudo ln -s /proc/6700/ns/net /var/run/netns/4026532598
pwl@ubuntu:~$  ip netns show
4026532598
3、创建一对虚拟网卡(veth pair),分别加入到旧 netns 和新 netns 中,配置对应两个同网段 ip:
pwl@ubuntu:~$ sudo ip link add veth00 type veth peer name veth10
pwl@ubuntu:~$ sudo ip link set dev veth10 netns 4026532598
pwl@ubuntu:~$ sudo ip netns exec 4026532598 ifconfig veth10 10.1.1.1/24 up
pwl@ubuntu:~$ sudo ifconfig veth00 10.1.1.2/24 up
pwl@ubuntu:~$
4、从新的 netns 中可以 ping 通旧的 netns :
root@ubuntu:~# ifconfig
veth10: flags=4099<UP,BROADCAST,MULTICAST>  mtu 1500
        inet 10.1.1.1  netmask 255.255.255.0  broadcast 10.1.1.255
        ether ce:d0:39:d7:1f:86  txqueuelen 1000  (Ethernet)
        RX packets 0  bytes 0 (0.0 B)
        RX errors 0  dropped 0  overruns 0  frame 0
        TX packets 0  bytes 0 (0.0 B)
        TX errors 0  dropped 0 overruns 0  carrier 0  collisions 0

root@ubuntu:~# ping 10.1.1.2
PING 10.1.1.2 (10.1.1.2) 56(84) bytes of data.
64 bytes from 10.1.1.2: icmp_seq=1 ttl=64 time=0.066 ms
64 bytes from 10.1.1.2: icmp_seq=2 ttl=64 time=0.040 ms
^C
--- 10.1.1.2 ping statistics ---
2 packets transmitted, 2 received, 0% packet loss, time 1027ms
rtt min/avg/max/mdev = 0.040/0.053/0.066/0.013 ms
5、增加一个网桥设备,让新的 netns 能 ping 通外网:
pwl@ubuntu:~$ sudo brctl addbr br00
pwl@ubuntu:~$ sudo brctl addif br00 veth00
pwl@ubuntu:~$ brctl show
bridge name     bridge id               STP enabled     interfaces
br-79007a57f712         8000.0242ce463a6b       no
br-cf283e550e84         8000.02420cae85cc       no              vethc5bcf22
br00            8000.6e8e9290533f       no              veth00
docker0         8000.024293d86502       no
pwl@ubuntu:~$ sudo ifconfig veth00 0.0.0.0
pwl@ubuntu:~$ sudo ifconfig br00 10.1.1.3/24 up
6、增加配置,让新的 netns 能 ping 通外网:
(注意:Docker 并不会把物理网卡加到网桥中,它是利用 IP Forward 功能把网桥数据转发到物理网卡的,参考 Linux虚拟网络设备之bridge(桥) 和 模拟 Docker网桥连接外网)
添加 iptables FORWARD 规则,并启动路由转发功能:
pwl@ubuntu:~$ sysctl -w net.ipv4.ip_forward=1
pwl@ubuntu:~$ sudo iptables -A FORWARD --out-interface ens33 --in-interface br00 -j ACCEPT
pwl@ubuntu:~$ sudo iptables -A FORWARD --in-interface ens33 --out-interface br00 -j ACCEPT
添加iptables NAT 规则:
pwl@ubuntu:~$ sudo iptables -t nat -A POSTROUTING --source 10.1.1.0/24 --out-interface ens33 -j MASQUERADE
新的 netns 中增加默认路由,通过物理网卡 ping 通外网:
root@ubuntu:~# ip route add default via 10.1.1.3 dev veth10
root@ubuntu:~# route
Kernel IP routing table
Destination     Gateway         Genmask         Flags Metric Ref    Use Iface
default         _gateway        0.0.0.0         UG    0      0        0 veth10
10.1.1.0        0.0.0.0         255.255.255.0   U     0      0        0 veth10
root@ubuntu:~# ping 10.91.47.97
PING 10.91.47.97 (10.91.47.97) 56(84) bytes of data.
64 bytes from 10.91.47.97: icmp_seq=1 ttl=127 time=2.89 ms
64 bytes from 10.91.47.97: icmp_seq=2 ttl=127 time=1.32 ms
代码解析
Network namespace 对应 struct net 结构。因为网络处理的复杂性,这里就不分析 net ns 对协议栈处理的影响,而是简单分析在 socket 层 和 网卡驱动层 对 net ns 的处理。
copy_net_ns()
clone() 和 unshare() 时如果设置了 CLONE_NEWNET 标志,则会调用 copy_net_ns() 来创建一个新的 network namespace:
create_new_namespaces() → copy_net_ns() → setup_net():

struct net *copy_net_ns(unsigned long flags,
			struct user_namespace *user_ns, struct net *old_net)
{
	struct ucounts *ucounts;
	struct net *net;
	int rv;

	if (!(flags & CLONE_NEWNET))
		return get_net(old_net);

	ucounts = inc_net_namespaces(user_ns);
	if (!ucounts)
		return ERR_PTR(-ENOSPC);

        /* (1) 分配一个新的 net ns */
	net = net_alloc();
	if (!net) {
		dec_net_namespaces(ucounts);
		return ERR_PTR(-ENOMEM);
	}


        /* (2) 设置启用新的 net ns */
	net->ucounts = ucounts;
	rv = setup_net(net, user_ns);
	if (rv == 0) {
		rtnl_lock();
                /* (3) 加入全局链表 */
		list_add_tail_rcu(&net->list, &net_namespace_list);
		rtnl_unlock();
	}

}

↓

static __net_init int setup_net(struct net *net, struct user_namespace *user_ns)
{
        /* (2.1) 逐个调用pernet_list链表中的ops,对新的 net ns 进行初始化 */
	list_for_each_entry(ops, &pernet_list, list) {
		error = ops_init(ops, net);
		if (error < 0)
			goto out_undo;
	}

}
pernet_list
全局链表 pernet_list 链接了多个 ops ,在新 net ns 初始化时逐个调用 ops->init() 。
可以使用 register_pernet_device() 函数向 pernet_list 链表中注册 ops,我们看看有哪些典型的 ops ,具体做了哪些操作。
loopback_net_ops
struct pernet_operations __net_initdata loopback_net_ops = {
	.init = loopback_net_init,
};

↓

static __net_init int loopback_net_init(struct net *net)
{
	struct net_device *dev;
	int err;

	err = -ENOMEM;
        /* (1) 给新的 net ns 分配了一个 loopback 本地环回网口 */
	dev = alloc_netdev(0, "lo", NET_NAME_UNKNOWN, loopback_setup);
	if (!dev)
		goto out;

        /* (2) 把网口设备设置为新的 net ns */
	dev_net_set(dev, net);

        /* (3) 注册网口设备 */
	err = register_netdev(dev);
	if (err)
		goto out_free_netdev;

	BUG_ON(dev->ifindex != LOOPBACK_IFINDEX);
	net->loopback_dev = dev;
	return 0;

out_free_netdev:
	free_netdev(dev);
out:
	if (net_eq(net, &init_net))
		panic("loopback: Failed to register netdevice: %d\n", err);
	return err;
}
netdev_net_ops
static struct pernet_operations __net_initdata netdev_net_ops = {
	.init = netdev_init,
	.exit = netdev_exit,
};

↓

static int __net_init netdev_init(struct net *net)
{
	if (net != &init_net)
		INIT_LIST_HEAD(&net->dev_base_head);

        /* (1) 创建 hash 链表数组 */
	net->dev_name_head = netdev_create_hash();
	if (net->dev_name_head == NULL)
		goto err_name;

        /* (2) 创建 hash 链表数组 */
	net->dev_index_head = netdev_create_hash();
	if (net->dev_index_head == NULL)
		goto err_idx;

	return 0;

err_idx:
	kfree(net->dev_name_head);
err_name:
	return -ENOMEM;
}
fou_net_ops
static struct pernet_operations fou_net_ops = {
	.init = fou_init_net,
	.exit = fou_exit_net,
	.id   = &fou_net_id,
	.size = sizeof(struct fou_net),
};

↓

static __net_init int fou_init_net(struct net *net)
{
        /* (1) 从 net->gen 中获取对应数据 */
	struct fou_net *fn = net_generic(net, fou_net_id);

        /* (2) 初始化相关结构 */
	INIT_LIST_HEAD(&fn->fou_list);
	mutex_init(&fn->fou_lock);
	return 0;
}
sock_net_set()
在 socket 创建时使用 sock_net_set() 函数将对应 net ns 设置成当前进程的 net ns 即 current->nsproxy->net_ns。
SYSCALL_DEFINE3(socket) → sock_create()

↓

int sock_create(int family, int type, int protocol, struct socket **res)
{
        /* (1) 配置 socket net ns 为当前进程的 net ns */
	return __sock_create(current->nsproxy->net_ns, family, type, protocol, res, 0);
}

↓

__sock_create() → pf->create() → inet_create() → sk_alloc() → sock_net_set()

void sock_net_set(struct sock *sk, struct net *net)
{
        /* (2) sk->sk_net 成员保存当前socket的 net ns */
	write_pnet(&sk->sk_net, net);
}
dev_net_set()
在网口设备注册时,默认加入到初始 net ns 即 init_net 中:
alloc_netdev() → alloc_netdev_mqs()

struct net_device *alloc_netdev_mqs(int sizeof_priv, const char *name,
		unsigned char name_assign_type,
		void (*setup)(struct net_device *),
		unsigned int txqs, unsigned int rxqs)
{

        /* (1) 初始化分配时,配置网络设备的 net ns 为默认的 init_net */
	dev_net_set(dev, &init_net);

}

↓

void dev_net_set(struct net_device *dev, struct net *net)
{
	write_pnet(&dev->nd_net, net);
}
后面可以通过 sudo ip link set dev veth10 netns 4026532598 之类的命令来把网口设备分配给不同的 net ns。
write_pnet()
不论是 sock_net_set() 还是 dev_net_set() 最后调用的都是 write_pnet() 函数,还有很多类似的 Linux 网络组件直接调用 write_pnet() 来更改 net ns,可以顺着这些调用来分析 net ns 对网络处理各个组件的影响。
static inline void write_pnet(possible_net_t *pnet, struct net *net)
{
#ifdef CONFIG_NET_NS
	pnet->net = net;
#endif
}
参考文档
猜你喜欢:
- 我要投稿:发表原创技术文章,收获福利、挚友与行业影响力
- 知识星球:独家 Linux 实战经验与技巧,订阅「Linux知识星球」
- 视频频道:泰晓学院,B 站,发布各类 Linux 视频课
- 开源小店:欢迎光临泰晓科技自营店,购物支持泰晓原创
- 技术交流:Linux 用户技术交流微信群,联系微信号:tinylab
| 支付宝打赏 | 微信打赏 | |
 |  请作者喝杯咖啡吧 |  |


