

[置顶] Linux Lab v1.2 升级部分内核到 v6.3.6,升级部分 QEMU 版本到 v8.0.2,新增 nolibc 和 NOMMU 开发支持,另有新增 4 款虚拟开发板:ppc/ppce500, arm/virt, loongarch/virt 和 s390x/s390-ccw-virtio。Linux Lab 发布 v1.2 正式版,新增 4 款虚拟开发板,支持 LoongArch, Linux v6.3.6 和 QEMU v8.0.2
User Namespace 详解
Peng Weilin 创作于 2021/03/17
By pwl999 of TinyLab.org Feb 02, 2021
简介
Linux 内核支持的 Namespaces 如下几类:
| 名称 | 宏定义 | 隔离内容 |
|---|---|---|
| Cgroup | CLONE_NEWCGROUP | Cgroup root directory (since Linux 4.6) |
| IPC | CLONE_NEWIPC | System V IPC, POSIX message queues (since Linux 2.6.19) |
| Network | CLONE_NEWNET | Network devices, stacks, ports, etc. (since Linux 2.6.24) |
| Mount | CLONE_NEWNS | Mount points (since Linux 2.4.19) |
| PID | CLONE_NEWPID | Process IDs (since Linux 2.6.24) |
| User | CLONE_NEWUSER | User and group IDs (started in Linux 2.6.23 and completed in Linux 3.8) |
| UTS | CLONE_NEWUTS | Hostname and NIS domain name (since Linux 2.6.19) |
User namespace 是其中最核心最复杂的,因为 user ns 是用来隔离和分割管理权限的,管理权限实质分为两部分 uid/gid 和 capability。
普通环境下的权限管理可以参考 Linux DAC 权限管理详解。
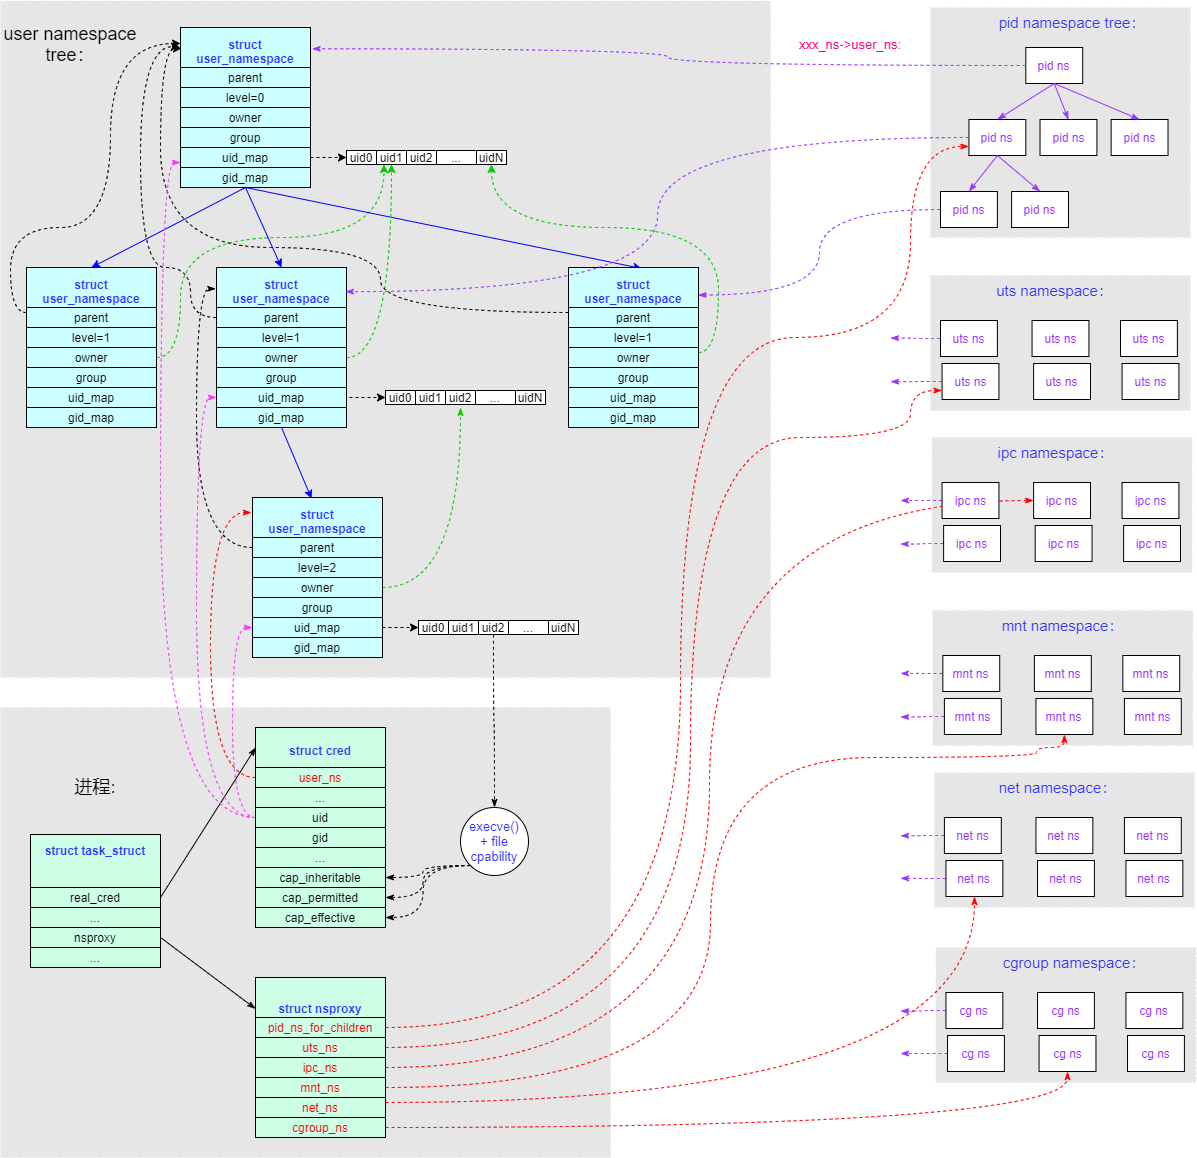
User namespace 的主要作用是隔离用户权限的,这里所说的用户权限包括 uid/gid 和 capability。它主要遵循以下准则:
- 进程与 Namespace
- User namespace 使用父子关系组成树形结构,进程需要指定树中的某个节点为本进程所在的 user namespace (即
task->real_cred->user_ns)。 - 每个其他类型的 namespace(UTS/PID/Mount/IPC/Network/Cgroup),都需要指定当前 ns 所属的 user namespace(即
xxx_ns->user_ns)。 - 每个进程使用一个代理结构来指定本进程所属的其他类型的 namespace (即
task->nsproxy->xxx_ns),这些 namespace 所属的 user namespace(即task->nsproxy->xxx_ns->user_ns) 和本进程所属的 user namespace(即task->real_cred->user_ns)不一定相等。 - 在创建新的 user namespace 时不需要任何权限;而在创建其他类型的 namespace(UTS/PID/Mount/IPC/Network/Cgroup) 时,需要进程在对应 user namespace 中有
CAP_SYS_ADMIN权限。
- User namespace 使用父子关系组成树形结构,进程需要指定树中的某个节点为本进程所在的 user namespace (即
- 关于
uid/gidUGO(编者注:应为 Linux User/Group/Other 用户权限管理机制的缩写)的主体(进程)和客体(文件)在各个子 user namespace 中规定了自己的映射关系,来把父 user ns 的uid/gid映射成本层次子 user ns 的uid/gid。这种映射关系需要用户手工配置(通过/proc/$$/uid_map和gid_map接口配置)。如果一个父 user ns 的uid/gid在子 user ns 中没有找到对应的转换关系配置,那么在子 user namespace 中它会变成默认 id(65534)。- 调用
getpid()/getuid()系统调用查询进程(主体)的uid/gid,返回的是由其在对应 user namespace (即task->real_cred->user_ns) 中的uid/gid确定的,和其在 user_ns 父辈的 user namespace 中的uid/gid无关。 - 调用
ls -n查询文件(客体)的uid/gid,返回的是由其在对应 user namespace (即task->real_cred->user_ns)中的uid/gid确定的,和其在 user_ns 父辈的 user namespace 中的uid/gid无关。 - 但是
UGO在进行进程(主体)和文件(客体)操作权限判断时,判断的是全局uid/gid(generic_permission() → acl_permission_check() → uid_eq())。进程的全局 uid/gid 保存在task->real_cred->uid/gid,文件的全局uid/gid保存在inode->i_uid/i_gid中。 - 进程(主体)能看到哪些文件(客体)由 mnt namespace 来指定(即
task->nsproxy->mnt_ns)和隔离。
- 关于 Capability
- 新创建一个 user namespace 会重新规划这个 ns 的 capability 能力,和这个 user namespace 父辈的 capability 能力无关。在新 user namespace 中 uid 0 等于 root 默认拥有所有 capability,普通用户的 capability 是在 execve() 时由
task->real_cred->cap_inheritable + file capability综合而成。 - 一个进程的特权能力 capability,是由其在对应 user namespace(即
task->real_cred->user_ns) 中的 capability(task->real_cred->cap_effective) 确定的,和其在 user_ns 父辈的 user namespace 中的 capability 无关。 - 在 capability 权限判断时(
ns_capable())也分为主体(进程)和客体,根据主体(进程)的 user namespace 和客体的 user namespace 关系来进行判断:- 如果主体(进程)的 user ns 和客体的 user ns 是同一层级为兄弟关系(即同一个父亲 user ns),或者主体的 user ns 比客体的 user ns 层级更多(最顶层
level=0,逐级增加),则禁止操作。 - 如果主体(进程)的 user ns 和客体的 user ns 相同,则根据主体(进程)的 capability(
task->real_cred->cap_effective) 是否有当前操作需要的能力来判断操作是否允许。 - 如果主体(进程)的 user ns 是客体的 user ns 的父节点,并且主体(进程)是客体的 user ns 的owner,则客体对主体拥有所有的 capability 权限。
- 如果主体(进程)的 user ns 和客体的 user ns 是同一层级为兄弟关系(即同一个父亲 user ns),或者主体的 user ns 比客体的 user ns 层级更多(最顶层
- 新创建一个 user namespace 会重新规划这个 ns 的 capability 能力,和这个 user namespace 父辈的 capability 能力无关。在新 user namespace 中 uid 0 等于 root 默认拥有所有 capability,普通用户的 capability 是在 execve() 时由
User Namespace 的创建
原理介绍
操作 namespace 的相关系统调用有 3 个:
clone(): 创建一个新的进程并把他放到新的 namespace 中。setns(): 将当前进程加入到已有的 namespace 中。unshare(): 使当前进程退出指定类型的 namespace,并加入到新创建的 namespace(相当于创建并加入新的 namespace)。
我们通常使用 unshare 命令来调用上述的各种函数。
注意:在创建新的 user namespace 时不需要任何权限;而在创建其他类型的 namespace(UTS/PID/Mount/IPC/Network/Cgroup)时,需要进程在对应 user namespace 中有
CAP_SYS_ADMIN权限。
操作实例
下面举一个例子说明:
- 查看普通进程 user namespace 的相关属性
# 父进程 pid = 2011
pwl@ubuntu:~$ echo $$
2011

# 当前 user namespace 对应的 inode id = 4026531837
pwl@ubuntu:~$ readlink /proc/$$/ns/user
user:[4026531837]

# 当前 user namespace 下:uid = 1000, gid = 1000
pwl@ubuntu:~$ id
uid=1000(pwl) gid=1000(pwl) groups=1000(pwl),4(adm),24(cdrom),27(sudo),30(dip),46(plugdev),116(lpadmin),126(sambashare),999(docker)

# 当前子 user namespace 和父 user namespace 的映射关系为:`子起始uid=0` `父起始uid=0` `映射个数=4294967295`
pwl@ubuntu:~$ cat /proc/$$/uid_map
         0          0 4294967295
pwl@ubuntu:~$ cat /proc/$$/gid_map
         0          0 4294967295

# 当前user namespace下的capability:CapInh=0 CapPrm=0 CapEff=0
pwl@ubuntu:~$ cat /proc/$$/status | grep Cap
CapInh: 0000000000000000
CapPrm: 0000000000000000
CapEff: 0000000000000000
CapBnd: 0000003fffffffff
CapAmb: 0000000000000000
- fork 子进程并创建一个新 user namespace,创建 uid/gid 映射,然后 exec 一个新的 bash shell
pwl@ubuntu:~$ unshare -r --user /bin/bash

# 子进程 pid = 3430
root@ubuntu:~# echo $$
3430

# 子 user namespace 对应的 inode id = 4026532632
root@ubuntu:~# readlink /proc/$$/ns/user
user:[4026532632]

# 当前 user namespace 下:uid = 0, gid = 0
root@ubuntu:~# id
uid=0(root) gid=0(root) groups=0(root),65534(nogroup)

# 当前子 user namespace 和父user namespace的映射关系为:`子起始uid=0` `父起始uid=1000` `映射个数=1`
root@ubuntu:~# cat /proc/$$/uid_map
         0       1000          1
root@ubuntu:~# cat /proc/$$/gid_map
         0       1000          1

# 当前user namespace 下的capability:CapInh=0x0000003fffffffff CapPrm=0x0000003fffffffff CapEff=0x0000003fffffffff
root@ubuntu:~#  cat /proc/$$/status | grep Cap
CapInh: 0000000000000000
CapPrm: 0000003fffffffff
CapEff: 0000003fffffffff
CapBnd: 0000003fffffffff
CapAmb: 0000000000000000
代码分析
clone() 和 unshare() 时如果设置了 CLONE_NEWUSER 标志,则会调用 create_user_ns() 来创建一个新的 user namespace:
copy_process() → copy_creds() → create_user_ns():

int create_user_ns(struct cred *new)
{
    struct user_namespace *ns, *parent_ns = new->user_ns;
    kuid_t owner = new->euid;
    kgid_t group = new->egid;
    struct ucounts *ucounts;
    int ret, i;

    ret = -ENOSPC;
    /* (1.1) user namespace不操作32个层级 */
    if (parent_ns->level > 32)
        goto fail;

    /* (1.2) */
    ucounts = inc_user_namespaces(parent_ns, owner);
    if (!ucounts)
        goto fail;

    /*
     * Verify that we can not violate the policy of which files
     * may be accessed that is specified by the root directory,
     * by verifing that the root directory is at the root of the
     * mount namespace which allows all files to be accessed.
     */
    /* (1.3) 通过验证根目录是否位于允许访问所有文件的装载名称空间的根目录,来验证我们是否违反了根目录所指定的可以访问哪些文件的策略。  */
    ret = -EPERM;
    if (current_chrooted())
        goto fail_dec;

    /* The creator needs a mapping in the parent user namespace
     * or else we won't be able to reasonably tell userspace who
     * created a user_namespace.
     */
    /* (1.4) 创建者需要在父用户名称空间中进行映射,否则我们将无法合理地告诉用户空间谁创建了user_namespace。  */
    ret = -EPERM;
    if (!kuid_has_mapping(parent_ns, owner) ||
        !kgid_has_mapping(parent_ns, group))
        goto fail_dec;

    ret = -ENOMEM;
    /* (2) 分配新的user namespace内存空间 */
    ns = kmem_cache_zalloc(user_ns_cachep, GFP_KERNEL);
    if (!ns)
        goto fail_dec;

    ret = ns_alloc_inum(&ns->ns);
    if (ret)
        goto fail_free;
    ns->ns.ops = &userns_operations;

    atomic_set(&ns->count, 1);
    /* (3) 初始化user namespace的各个成员 */
    /* Leave the new->user_ns reference with the new user namespace. */
    ns->parent = parent_ns;                 // 父节点
    ns->level = parent_ns->level + 1;       // 在父节点基础上增加level
    ns->owner = owner;                      // 设置user ns的owner uid
    ns->group = group;                      // 设置user ns的owner gid
    INIT_WORK(&ns->work, free_user_ns);
    for (i = 0; i < UCOUNT_COUNTS; i++) {
        ns->ucount_max[i] = INT_MAX;
    }
    ns->ucounts = ucounts;

    /* Inherit USERNS_SETGROUPS_ALLOWED from our parent */
    mutex_lock(&userns_state_mutex);
    ns->flags = parent_ns->flags;
    mutex_unlock(&userns_state_mutex);

#ifdef CONFIG_PERSISTENT_KEYRINGS
    init_rwsem(&ns->persistent_keyring_register_sem);
#endif
    ret = -ENOMEM;
    if (!setup_userns_sysctls(ns))
        goto fail_keyring;

    /* (4) 将新的user namespace设置到cred->user_ns */
    set_cred_user_ns(new, ns);
    return 0;
fail_keyring:
#ifdef CONFIG_PERSISTENT_KEYRINGS
    key_put(ns->persistent_keyring_register);
#endif
    ns_free_inum(&ns->ns);
fail_free:
    kmem_cache_free(user_ns_cachep, ns);
fail_dec:
    dec_user_namespaces(ucounts);
fail:
    return ret;
}

static void set_cred_user_ns(struct cred *cred, struct user_namespace *user_ns)
{
    /* Start with the same capabilities as init but useless for doing
     * anything as the capabilities are bound to the new user namespace.
     */
    /* (4.1) 对于本user namespace初始的第一进程,赋予所有的capability */
    cred->securebits = SECUREBITS_DEFAULT;
    cred->cap_inheritable = CAP_EMPTY_SET;
    cred->cap_permitted = CAP_FULL_SET;
    cred->cap_effective = CAP_FULL_SET;
    cred->cap_ambient = CAP_EMPTY_SET;
    cred->cap_bset = CAP_FULL_SET;
#ifdef CONFIG_KEYS
    key_put(cred->request_key_auth);
    cred->request_key_auth = NULL;
#endif
    /* tgcred will be cleared in our caller bc CLONE_THREAD won't be set */
    /* (4.2) 替换cred中的user_ns为新值 */
    cred->user_ns = user_ns;
}
uid/gid 隔离
原理介绍
User Namespace 的第一个作用是隔离 uid/gid,每个 User Namespace 拥有独立的从 0 开始的 uid/gid。这样容器中的进程可以拥有 root 权限,但是它的 root 权限会被限制在一小块范围之内。
uid_gid_map
User namespace 还有一个特点,就它需要手工创建父子 User namespace uid/gid 的映射关系表。如果没有在表中设置映射关系的父 uid/gid,对应默认值 65534。
task->real_creds->uid/gid中保存的是全局(即0层)uid/gid。from_kuid()函数通过查询uid_map把全局 uid 转换成对应 user ns 的uid,make_kuid()函数通过查询 uid_map 把对应 user ns 的 uid 转换成全局 uid。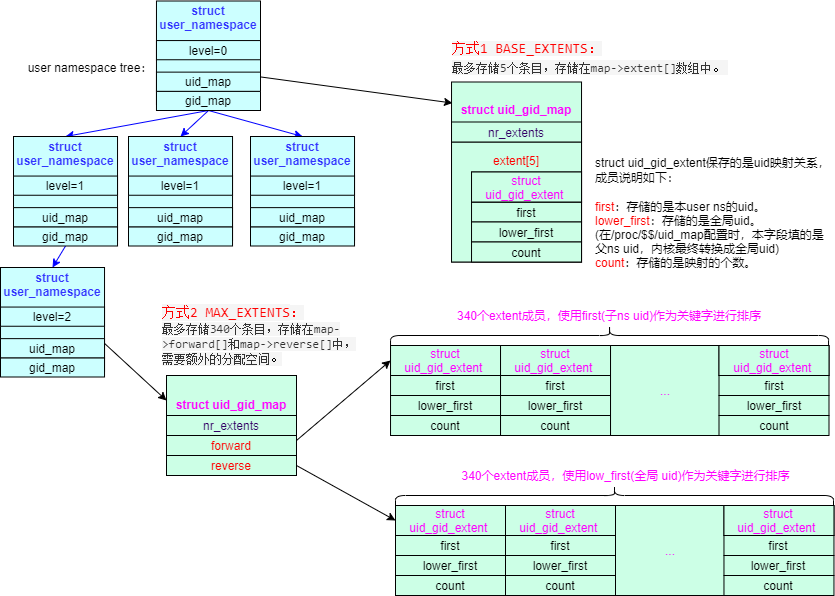
通过上图可以看到,uid_gid_map有两种工作模式:
- 方式1 BASE_EXTENTS:最多存储 5 个条目,存储在
map->extent[]数组中。 - 方式2 MAX_EXTENTS:存储大于 5 个条目时使用,最多存储 340 个条目,存储在
map->forward[]和map->reverse[]中,需要额外的分配空间。
- 方式1 BASE_EXTENTS:最多存储 5 个条目,存储在
/proc/$$/uid_map 和 gid_map映射关系表
ns->uid_map/ns->gid_map可以通过对应进程的/proc/$$/uid_map和gid_map文件接口来设置。配置格式为:<first1> <lower_first1> <count1>\n<first2> <lower_first2> <count2>\n...\nfirst为本子 user ns 的起始 uid,lower_first为父 user ns 的起始 uid(内核会转换成全局uid),count为映射的个数。所以如果是多级 ns 嵌套配置时,lower_first必须是父 user ns 中存在的 uid,否则会配置出错。配置实例程序:
#include <err.h>
#include <fcntl.h>
#include <stdio.h>
#include <unistd.h>

int main(void)
{
    const char* id_mapping = "0 0 1\n1 1 1\n2 2 1\n3 3 1\n4 4 1\n6 6 10\n5 5 1\n";
    int uid_map = open("/proc/4497/uid_map", O_WRONLY);

    if (uid_map == -1)
        err(1, "open uid map");

    if (write(uid_map, id_mapping, strlen(id_mapping)) != strlen(id_mapping))
        err(1, "write uid map");

    close(uid_map);
}
还有一些限制:

- 只能向 map 文件写一次数据,但可以一次写多条。
- 写 map 文件需要拥有 `CAP_SETUID` 和 `CAP_SETGID` 的 capability。
思考:pid namespace 它也是树形层次结构,但每一层的 pid 都是自动分配的。为什么 user namespace 的
uid/gid需要手工映射?主要原因还是这个关系比较关键,不能自动配置正确。
操作实例
上个例子是使用 unshare -r 参数设置了映射关系,我们看看通过 /proc/$$/uid_map 和 gid_map 手工设置映射关系的方法。
- fork 子进程并创建一个新 user namespace,然后 exec 一个新的 bash shell,但是没有创建 uid/gid 映射关系
pwl@ubuntu:~$ unshare --user /bin/bash
nobody@ubuntu:~$ echo $$
3948

# 新的 user namespace 和父 user namespace 的 uid/gid 映射关系为空
nobody@ubuntu:~$ cat /proc/$$/uid_map

# 在新的 user namespace 中查询 uid/gid 失败,返回默认值 65534
nobody@ubuntu:~$ id
uid=65534(nobody) gid=65534(nogroup) groups=65534(nogroup)
nobody@ubuntu:~$ pwd
/home/pwl

# 查询 home 目录下的文件属主是 nobody/nogroup
nobody@ubuntu:~$ ll
total 600
drwxr-xr-x 33 nobody nogroup   4096 1月  27 22:21 ./
nobody@ubuntu:~$ ls -n
drwxrwxr-x 3 65534 65534 4096 10月 27 02:56 tmp
- 在另外一个 shell 窗口对新的 user namespace 映射关系进行配置
# 需要给 bash 加上 CAP_SETUID 和 CAP_SETGID 的能力
pwl@ubuntu:~$ sudo setcap cap_setuid,cap_setgid+ep /bin/bash
[sudo] password for pwl:

# 起一个新的 bash shell
pwl@ubuntu:~$ bash

# 确认当前 bash 有 CAP_SETUID 和 CAP_SETGID 能力
pwl@ubuntu:~$ cat /proc/$$/status | grep Cap
CapInh: 0000000000000000
CapPrm: 00000000000000c0
CapEff: 00000000000000c0
CapBnd: 0000003fffffffff
CapAmb: 0000000000000000

# 修改 uid_map/gid_map 映射文件
pwl@ubuntu:~$ echo '0 1000 10' > /proc/3948/uid_map
pwl@ubuntu:~$ echo '0 1000 10' > /proc/3948/gid_map

# 退出并取消 bash 的 CAP_SETUID 和 CAP_SETGID 的能力
pwl@ubuntu:~$ exit
pwl@ubuntu:~$ sudo setcap cap_setuid,cap_setgid-ep /bin/bash
- 回到原来的
3948shell窗口,重新看配置已经生效
nobody@ubuntu:~$ cat /proc/$$/uid_map
         0       1000         10
nobody@ubuntu:~$ cat /proc/$$/gid_map
         0       1000         10
nobody@ubuntu:~$ id
uid=0(root) gid=0(root) groups=0(root),65534(nogroup)

# 查询home目录下的文件属主变成了root/root
nobody@ubuntu:~$ ll
total 600
drwxr-xr-x 33 root   root      4096 1月  28 19:02 ./
nobody@ubuntu:~$ ls -n
drwxrwxr-x 3 0 0 4096 10月 27 02:56 tmp
代码分析
map_write()
本函数是写 /proc/$$/uid_map 和 gid_map 文件的具体实现,核心是创建 User Namespace 的 uid/gid 父子映射关系表。
proc_uid_map_operations → proc_uid_map_write() → map_write():

static ssize_t map_write(struct file *file, const char __user *buf,
             size_t count, loff_t *ppos,
             int cap_setid,
             struct uid_gid_map *map,
             struct uid_gid_map *parent_map)
{
    struct seq_file *seq = file->private_data;
    struct user_namespace *ns = seq->private;
    struct uid_gid_map new_map;
    unsigned idx;
    struct uid_gid_extent extent;
    char *kbuf = NULL, *pos, *next_line;
    ssize_t ret;

    /* Only allow < page size writes at the beginning of the file */
    if ((*ppos != 0) || (count >= PAGE_SIZE))
        return -EINVAL;

    /* Slurp in the user data */
    /* (1.1) 拷贝用户态参数到内核态空间 */
    kbuf = memdup_user_nul(buf, count);
    if (IS_ERR(kbuf))
        return PTR_ERR(kbuf);

    mutex_lock(&userns_state_mutex);

    /* (1.2) uid/gid_map清零 */
    memset(&new_map, 0, sizeof(struct uid_gid_map));

    ret = -EPERM;
    /* Only allow one successful write to the map */
    /* (1.3) 如果uid/gid_map被配置过,不再允许配置(只允许写一次) */
    if (map->nr_extents != 0)
        goto out;

    /*
     * Adjusting namespace settings requires capabilities on the target.
     */
    if (cap_valid(cap_setid) && !file_ns_capable(file, ns, CAP_SYS_ADMIN))
        goto out;

    /* Parse the user data */
    ret = -EINVAL;
    pos = kbuf;
    /* (2) 逐行解析传入的用户配置参数,用户参数的格式为:
            <first1> <lower_first1> <count1> \n
            <first2> <lower_first2> <count2> \n
            ...
            格式解析:
                first           表示当前user namespace的起始uid/gid
                lower_first     表示父user namespace的起始uid/gid
                count           表示映射的长度
     */
    for (; pos; pos = next_line) {

        /* Find the end of line and ensure I don't look past it */
        next_line = strchr(pos, '\n');
        if (next_line) {
            *next_line = '\0';
            next_line++;
            if (*next_line == '\0')
                next_line = NULL;
        }

        /* (2.1) 一行用户参数条目提取到一个extent结构当中 */
        pos = skip_spaces(pos);
        extent.first = simple_strtoul(pos, &pos, 10);
        if (!isspace(*pos))
            goto out;

        pos = skip_spaces(pos);
        extent.lower_first = simple_strtoul(pos, &pos, 10);
        if (!isspace(*pos))
            goto out;

        pos = skip_spaces(pos);
        extent.count = simple_strtoul(pos, &pos, 10);
        if (*pos && !isspace(*pos))
            goto out;

        /* Verify there is not trailing junk on the line */
        pos = skip_spaces(pos);
        if (*pos != '\0')
            goto out;

        /* Verify we have been given valid starting values */
        if ((extent.first == (u32) -1) ||
            (extent.lower_first == (u32) -1))
            goto out;

        /* Verify count is not zero and does not cause the
         * extent to wrap
         */
        if ((extent.first + extent.count) <= extent.first)
            goto out;
        if ((extent.lower_first + extent.count) <=
             extent.lower_first)
            goto out;

        /* Do the ranges in extent overlap any previous extents? */
        /* (2.2) 判断新一行的参数,和之前map中的参数是否有重合 */
        if (mappings_overlap(&new_map, &extent))
            goto out;

        /* (2.3) 是否超过了map能存储的最多条目340个 */
        if ((new_map.nr_extents + 1) == UID_GID_MAP_MAX_EXTENTS &&
            (next_line != NULL))
            goto out;

        /* (2.4) 把条目插入到map当中,map有两种方法来存储条目:
                方式1 BASE_EXTENTS:最多存储5个条目,存储在map->extent[]数组中
                方式2 MAX_EXTENTS:最多存储340个条目,存储在map->forward[]和map->reverse[]中,需要额外的分配空间
                    map->forward[]存储的是以子user ns排序的映射条目
                    map->reverse[]存储的是以全局user ns排序的映射条目
         */
        ret = insert_extent(&new_map, &extent);
        if (ret < 0)
            goto out;
        ret = -EINVAL;
    }
    /* Be very certaint the new map actually exists */
    if (new_map.nr_extents == 0)
        goto out;

    ret = -EPERM;
    /* Validate the user is allowed to use user id's mapped to. */
    /* (3) 需要CAP_SETUID和CAP_SETGID能力才能配置 */
    if (!new_idmap_permitted(file, ns, cap_setid, &new_map))
        goto out;

    ret = -EPERM;
    /* Map the lower ids from the parent user namespace to the
     * kernel global id space.
     */
    /* (4) 变量map中的每个条目,把lower_first存储的父user ns的uid/gid转换成全局uid/gid */
    for (idx = 0; idx < new_map.nr_extents; idx++) {
        struct uid_gid_extent *e;
        u32 lower_first;

        if (new_map.nr_extents <= UID_GID_MAP_MAX_BASE_EXTENTS)
            e = &new_map.extent[idx];
        else
            e = &new_map.forward[idx];

        /* (4.1) 条目中指定的父user ns的uid/gid,必须在父user ns的map中是合法的 */
        lower_first = map_id_range_down(parent_map,
                        e->lower_first,
                        e->count);

        /* Fail if we can not map the specified extent to
         * the kernel global id space.
         */
        if (lower_first == (u32) -1)
            goto out;

        e->lower_first = lower_first;
    }

    /*
     * If we want to use binary search for lookup, this clones the extent
     * array and sorts both copies.
     */
    /* (5) 如果map是方式2 MAX_EXTENTS,复制map->forward[]到map->reverse[]中,并且进行排序
            map->forward[]存储的是以子user ns排序的映射条目
            map->reverse[]存储的是以全局user ns排序的映射条目
            这里发生过一个漏洞CVE-2018-18955,感兴趣可以详细查看一下
     */
    ret = sort_idmaps(&new_map);
    if (ret < 0)
        goto out;

    /* Install the map */
    /* (6) 把新的map配置生效  */
    if (new_map.nr_extents <= UID_GID_MAP_MAX_BASE_EXTENTS) {
        memcpy(map->extent, new_map.extent,
               new_map.nr_extents * sizeof(new_map.extent[0]));
    } else {
        map->forward = new_map.forward;
        map->reverse = new_map.reverse;
    }
    smp_wmb();
    map->nr_extents = new_map.nr_extents;

    *ppos = count;
    ret = count;
out:
    if (ret < 0 && new_map.nr_extents > UID_GID_MAP_MAX_BASE_EXTENTS) {
        kfree(new_map.forward);
        kfree(new_map.reverse);
        map->forward = NULL;
        map->reverse = NULL;
        map->nr_extents = 0;
    }

    mutex_unlock(&userns_state_mutex);
    kfree(kbuf);
    return ret;
}
getuid()
我们在获取进程 uid/gid 时,也会转换成当前 user ns 的 uid/gid,而不会返回全局的 uid/gid:
SYSCALL_DEFINE0(getuid)
{
    /* Only we change this so SMP safe */
    /* (1) current_uid()获取的是全局uid,current_user_ns()获取的是当前user ns
            将全局uid转换成当前user ns中的uid
     */
    return from_kuid_munged(current_user_ns(), current_uid());
}

↓

uid_t from_kuid_munged(struct user_namespace *targ, kuid_t kuid)
{
    uid_t uid;
    uid = from_kuid(targ, kuid);

    if (uid == (uid_t) -1)
        uid = overflowuid;
    return uid;
}
stat64()
我们在获取文件 uid/gid 时,也会转换成当前 user ns 的 uid/gid,而不会返回全局的 uid/gid:
linux-source-4.15.0\fs\stat.c:

SYSCALL_DEFINE2(stat64, const char __user *, filename,
        struct stat64 __user *, statbuf)
{
    struct kstat stat;
    /* (1) 从文件inode中获得全局uid/gid,inode->i_uid/i_gid */
    int error = vfs_stat(filename, &stat);

    if (!error)
        /* (2) 根据user ns进行转换 */
        error = cp_new_stat64(&stat, statbuf);

    return error;
}

static long cp_new_stat64(struct kstat *stat, struct stat64 __user *statbuf)
{

    /* (2.1) 把从文件inode中获取的全局uid转换成当前user namespace对应的uid */
    tmp.st_uid = from_kuid_munged(current_user_ns(), stat->uid);
    tmp.st_gid = from_kgid_munged(current_user_ns(), stat->gid);

}
acl_permission_check()
但是在主体(进程)操作客体(文件)进行 UGO 规则校验时,进程和文件使用的都是全局 uid/gid。
inode_permission() → __inode_permission() → do_inode_permission() → generic_permission() → acl_permission_check()

static int acl_permission_check(struct inode *inode, int mask)
{
    /* (1) 从i_mode中取出UGO规则 */
    unsigned int mode = inode->i_mode;

    /* (2) User用户取最高3bit规则,主体进程的euid等于客体文件的uid
            current_fsuid()获得进程的全局uid
            inode->i_uid获得文件的全局uid
     */
    if (likely(uid_eq(current_fsuid(), inode->i_uid)))
        mode >>= 6;
    else {
        /* (3) User用户匹配失败首先去匹配ACL规则 */
        if (IS_POSIXACL(inode) && (mode & S_IRWXG)) {
            int error = check_acl(inode, mask);
            if (error != -EAGAIN)
                return error;
        }

        /* (4) ACL匹配失败则尝试匹配Group用户规则,
                Group用户取中间3bit规则,主体进程的egid等于客体文件的gid
        */
        if (in_group_p(inode->i_gid))
            mode >>= 3;
    }
    /* (5) 如果以上条件都未匹配成功,则为Other用户,取最低3bit规则 */

    /*
     * If the DACs are ok we don't need any capability check.
     */
    /* (6) 使用规则允许的3bit和当前操作进行匹配,决定放行还是拒绝 */
    if ((mask & ~mode & (MAY_READ | MAY_WRITE | MAY_EXEC)) == 0)
        return 0;
    return -EACCES;
}
Capability 隔离
原理介绍
User Namespace 的第二个作用是隔离 capability。
在层次化的 User Namespace 树形结构中,每个 User namespace 的 capability 都是独立管理。进程的 capability 属性的变化会遵循以下的原则:
如果进程对应的 user namespace 有多个父辈节点,进程只会使用当前 user namespace 的 capability,而不会使用父 user namespace 节点的 capability。进程
task->real_cred->cap_effective/cap_permitted/cap_inheritable保存的是当前 user namespace 中 capability。在
clone()和unshare()时使用CLONE_NEWUSER创建一个新的 user namespace,创建完成后本进程的task->real_cred->user_ns会指向新的 user namespace,且当前进程不论uid/gid如何会拥有所有 capability(在set_cred_user_ns()中设置)。因为上一步的
cap_inheritable并没有设置,所有它的超级权限在execve()后会被清空,重新按照uid/gid和 elf 文件自带的 capability 综合处新的 capability。在这个阶段,最好配置
/proc/$$/uid_map 和 gid_map完以后,再做别的操作。执行
execve()后 capability 会被重新计算,详细计算规则在cap_bprm_set_creds()函数中。在进行 capability 权限校验(ns_capable())时,主体(进程)和客体(资源)都有自己的 user namespace。这时需要综合主客体的 user namespace 关系和 capability 能力来进行判决
- 如果主体(进程)的 user ns 和客体的 user ns 是同一层级为兄弟关系(即同一个父亲 user ns),或者主体的 user ns 比客体的 user ns 层级更多(最顶层
level=0,逐级增加),则禁止操作。 - 如果主体(进程)的 user ns 和客体的 user ns 相同,则根据主体(进程)的 capability(
task->real_cred->cap_effective)是否有当前操作需要的能力来判断操作是否允许。 - 如果主体(进程)的 user ns 是客体的 user ns 的父节点,并且主体(进程)是客体的 user ns 的 owner,则客体对主体拥有所有的 capability 权限。
- 如果主体(进程)的 user ns 和客体的 user ns 是同一层级为兄弟关系(即同一个父亲 user ns),或者主体的 user ns 比客体的 user ns 层级更多(最顶层
正因为 capability 主体(进程)和客体(资源)可以拥有自己的 user namespace,所以 user namespace 才能做到在每一层次独立管理 capability。
注意:与之对应的是系统并没有实现每一层次 user namespace 的
uid/gid独立,UGO中起作用的还是全局uid/gid。这是 user namespace 中非常容易弄混淆的地方。
操作实例
- 任意进程创建一个新的 user namespace,他会拥有所有 capability
pwl@ubuntu:~/ns$ vim unshare_test.c
#include <err.h>
#include <fcntl.h>
#include <grp.h>
#include <sched.h>
#include <stdio.h>
#include <sys/socket.h>
#include <sys/un.h>
#include <sys/wait.h>
#include <unistd.h>
#include <sched.h>
#include <linux/sched.h>

int main(void)
{
    if(unshare(CLONE_NEWUSER)!=0)
    {
        printf("failed to create new user namespase\n");
    }

    while(1) sleep(1);
}

pwl@ubuntu:~/ns$ gcc unshare_test.c -o unshare_test
pwl@ubuntu:~/ns$ ./unshare_test &
pwl@ubuntu:~$ ps -ef | grep unshare
pwl        6950   6812  0 00:35 pts/1    00:00:00 ./unshare_test
pwl        6952   5779  0 00:35 pts/0    00:00:00 grep --color=auto unshare

# 初始状态拥有所有的capability
pwl@ubuntu:~$ cat /proc/6950/status | grep Cap
CapInh: 0000000000000000    // 继承Cap为空,不能继承
CapPrm: 0000003fffffffff
CapEff: 0000003fffffffff
CapBnd: 0000003fffffffff
CapAmb: 0000000000000000
- 如果是 fork() 子进程,子进程也拥有所有 capability
pwl@ubuntu:~/ns$ vim unshare_test.c
#include <err.h>
#include <fcntl.h>
#include <grp.h>
#include <sched.h>
#include <stdio.h>
#include <sys/socket.h>
#include <sys/un.h>
#include <sys/wait.h>
#include <unistd.h>
#include <sched.h>
#include <linux/sched.h>

int main(void)
{
    if(unshare(CLONE_NEWUSER)!=0)
    {
        printf("failed to create new user namespase\n");
    }

    pid_t pid;
    pid = fork();
    if (pid>0)
    {
        printf("This is the parent process,the child has the pid:%d\n", pid);
        while(1) sleep(1);
    }
    else if (!pid)
    {
        printf("This is the child Process.\n");
        while(1) sleep(1);
    }
    else
    {
        printf("fork failed.\n");
    }
}

pwl@ubuntu:~/ns$ gcc unshare_test.c -o unshare_test
pwl@ubuntu:~/ns$ ./unshare_test &
pwl@ubuntu:~$ ps -ef | grep unshare
pwl        7828   6812  0 01:42 pts/1    00:00:00 ./unshare_test
pwl        7829   7828  0 01:42 pts/1    00:00:00 ./unshare_test
pwl        7833   5779  0 01:43 pts/0    00:00:00 grep --color=auto unshare
pwl@ubuntu:~$ cat /proc/7828/status | grep Cap
CapInh: 0000000000000000
CapPrm: 0000003fffffffff
CapEff: 0000003fffffffff
CapBnd: 0000003fffffffff
CapAmb: 0000000000000000

# fork()的子进程也拥有所有capability
pwl@ubuntu:~$ cat /proc/7829/status | grep Cap
CapInh: 0000000000000000
CapPrm: 0000003fffffffff
CapEff: 0000003fffffffff
CapBnd: 0000003fffffffff
CapAmb: 0000000000000000
- execve() 一个新程序,会重新计算 capability:
pwl@ubuntu:~/ns$ vim unshare_test.c
#include <err.h>
#include <fcntl.h>
#include <grp.h>
#include <sched.h>
#include <stdio.h>
#include <sys/socket.h>
#include <sys/un.h>
#include <sys/wait.h>
#include <unistd.h>
#include <sched.h>
#include <linux/sched.h>

int main(void)
{
    if(unshare(CLONE_NEWUSER)!=0)
    {
        printf("failed to create new user namespase\n");
    }

    char * argv[ ]={"./bash",(char *)0};
    char * envp[ ]={0};
    execve("/bin/bash",argv,envp);
}

pwl@ubuntu:~/ns$ gcc unshare_test.c -o unshare_test
pwl@ubuntu:~/ns$ ./unshare_test

# 初始状态的超级权限被清理,重新计算了capability
nobody@ubuntu:/home/pwl/ns$ cat /proc/$$/status | grep Cap
CapInh: 0000000000000000
CapPrm: 0000000000000000
CapEff: 0000000000000000
CapBnd: 0000003fffffffff
CapAmb: 0000000000000000
- execve() 时如果 uid 为0,会被认为是 root 用户,赋予所有 capability
pwl@ubuntu:~$ unshare -r --user /bin/bash
root@ubuntu:~# cat /proc/$$/status | grep Cap
CapInh: 0000000000000000
CapPrm: 0000003fffffffff
CapEff: 0000003fffffffff
CapBnd: 0000003fffffffff
CapAmb: 0000000000000000
root@ubuntu:~# id
uid=0(root) gid=0(root) groups=0(root),65534(nogroup)
root@ubuntu:~#
代码分析
ns_capable()
ns_capable() 负责主体(进程)和客体(资源)的 capability 进行校验,核心逻辑在 cap_capable() 中:
bool ns_capable(struct user_namespace *ns, int cap)
{
    return ns_capable_common(ns, cap, CAP_OPT_NONE);
}

↓
ns_capable_common()  security_capable() cap_capable()
↓

int cap_capable(const struct cred *cred, struct user_namespace *targ_ns,
        int cap, unsigned int opts)
{
    /* (1) targ_ns中存放的是客体(资源)的user ns
            cred->cap_effective中存放的是主体(进程)的user ns
     */
    struct user_namespace *ns = targ_ns;

    /* See if cred has the capability in the target user namespace
     * by examining the target user namespace and all of the target
     * user namespace's parents.
     */
    for (;;) {
        /* Do we have the necessary capabilities? */
        /* (2.1) 如果主体和客体的user ns相同,判断主体是否拥有操作客体需要的capability */
        if (ns == cred->user_ns)
            return cap_raised(cred->cap_effective, cap) ? 0 : -EPERM;

        /*
         * If we're already at a lower level than we're looking for,
         * we're done searching.
         */
        /* (2.2) 如果主体的user ns和客体的user ns是同一层次但不相同,
                或者主体的user ns比客体的user ns层次更低,禁止操作
                主体禁止操作比自己user ns层次高的客体
         */
        if (ns->level <= cred->user_ns->level)
            return -EPERM;

        /*
         * The owner of the user namespace in the parent of the
         * user namespace has all caps.
         */
        /* (2.3) 如果主体比客体的user ns层次高,主体是客体user ns的父节点,且uid是客体user ns的owner
                 则主体对客体拥有所有capability
         */
        if ((ns->parent == cred->user_ns) && uid_eq(ns->owner, cred->euid))
            return 0;

        /*
         * If you have a capability in a parent user ns, then you have
         * it over all children user namespaces as well.
         */
        /* (2.4) 如果主体user ns比客体高,客体逐步向上层查找,
                看看是否能满足(2.1)或(2.3)条件
         */
        ns = ns->parent;
    }

    /* We never get here */
}
cap_bprm_set_creds()
cap_bprm_set_creds() 函数负责在 execve 时,根据 uid/gid 和可执行文件的 capability 来重新计算进程的 capability:
do_execve() → do_execveat_common()→ prepare_binprm() → security_bprm_set_creds() → cap_bprm_set_creds():

int cap_bprm_set_creds(struct linux_binprm *bprm)
{
    const struct cred *old = current_cred();
    struct cred *new = bprm->cred;
    bool effective = false, has_fcap = false, is_setid;
    int ret;
    kuid_t root_uid;

    if (WARN_ON(!cap_ambient_invariant_ok(old)))
        return -EPERM;

    ret = get_file_caps(bprm, &effective, &has_fcap);
    if (ret < 0)
        return ret;

    /* (1) root uid等于0 */
    root_uid = make_kuid(new->user_ns, 0);

    /* (2) 判断当前进程是不是root用户,针对root权限的capability能力赋值 */
    handle_privileged_root(bprm, has_fcap, &effective, root_uid);

    /* (3) 普通用户的capability综合过程 */
    /* if we have fs caps, clear dangerous personality flags */
    if (__cap_gained(permitted, new, old))
        bprm->per_clear |= PER_CLEAR_ON_SETID;

    ...
}
参考文档
猜你喜欢:
- 我要投稿:发表原创技术文章,收获福利、挚友与行业影响力
- 知识星球:独家 Linux 实战经验与技巧,订阅「Linux知识星球」
- 视频频道:泰晓学院,B 站,发布各类 Linux 视频课
- 开源小店:欢迎光临泰晓科技自营店,购物支持泰晓原创
- 技术交流:Linux 用户技术交流微信群,联系微信号:tinylab
| 支付宝打赏 | 微信打赏 | |
 |  请作者喝杯咖啡吧 |  |