

[置顶] Linux Lab v1.2 升级部分内核到 v6.3.6,升级部分 QEMU 版本到 v8.0.2,新增 nolibc 和 NOMMU 开发支持,另有新增 4 款虚拟开发板:ppc/ppce500, arm/virt, loongarch/virt 和 s390x/s390-ccw-virtio。Linux Lab 发布 v1.2 正式版,新增 4 款虚拟开发板,支持 LoongArch, Linux v6.3.6 和 QEMU v8.0.2
Mnt Namespace 详解
Peng Weilin 创作于 2021/04/13
By pwl999 of [TinyLab.org][1] Mar 01, 2021
文件系统层次化
对 Linux 系统来说一切皆文件,Linux 使用树形的层次化结构来管理所有的文件对象。
完整的 Linux 文件系统,是由多种设备、多种文件系统组成的一个混合的树形结构。我们首先从一个单独的块设备来分析其树形结构的构造。
块设备的层次化(superblock/inode/dentry)
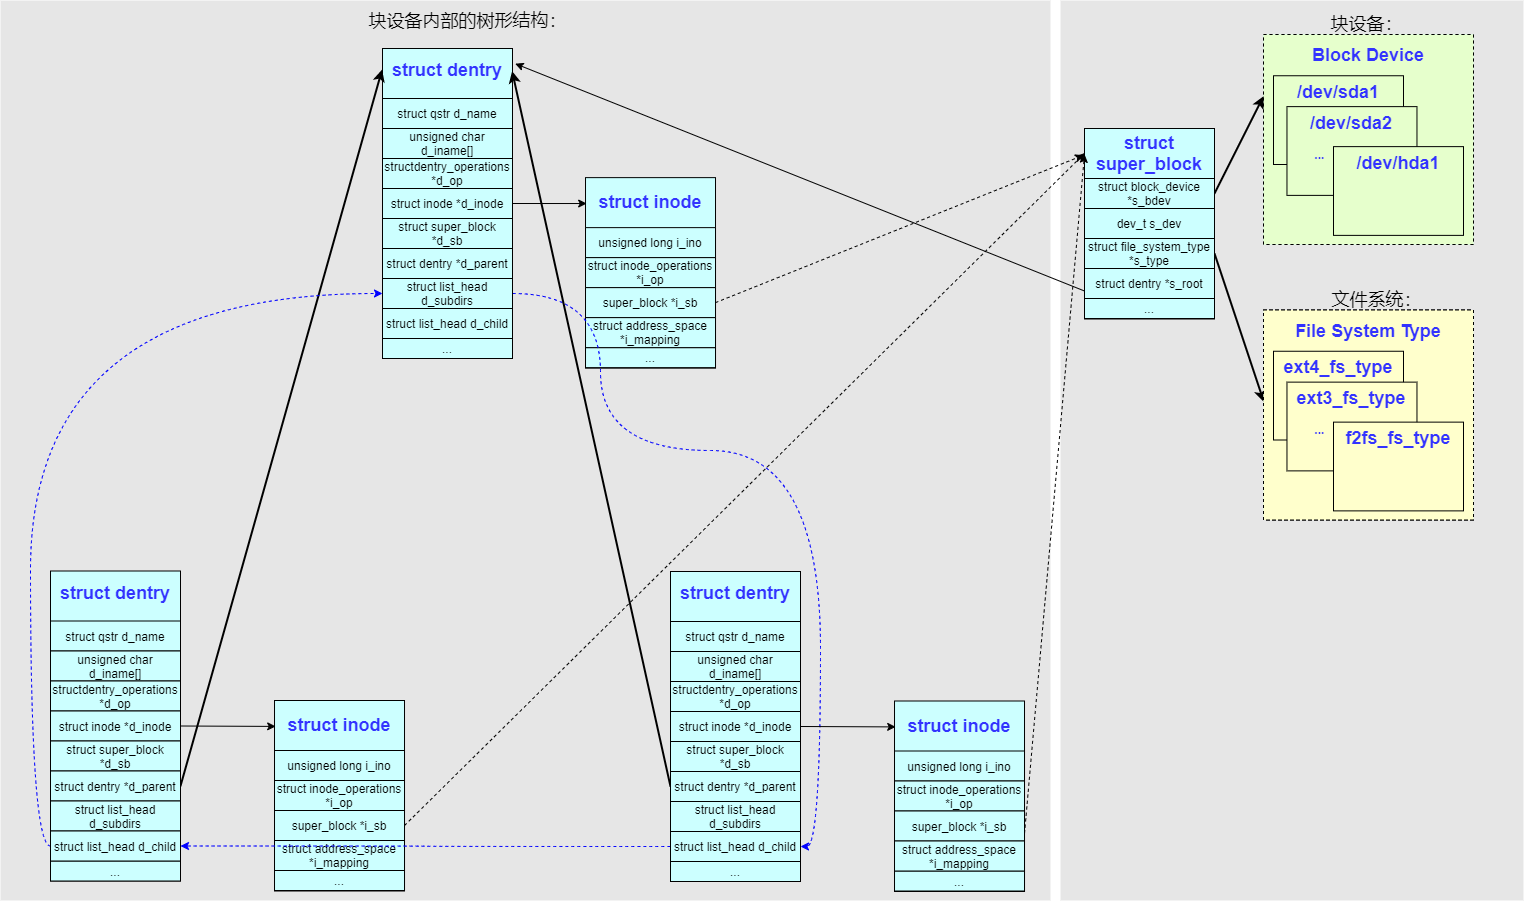
对一个块设备来说要想构造文件系统树形结构,最重要的两个全局因素是:块设备(block_device)和文件系统(file_system_type)。内核使用了一个数据结构 struct super_block 把这两者结合起来,用来标识一个块设备。
确定了 super_block 以后,就可以使用文件系统提供的方法来解析块设备的内容,形成一个块设备内部的树形结构,也就是我们熟悉的文件夹、文件的层次结构。
系统使用 struct inode 结构来标识块设备内部的一个文件夹或者文件,struct inode 结构中最重要的成员是 ->i_ino 这个记录了 inode 在块设备中的偏移。
系统为了辅助 struct inode 的使用还设计了一个 struct dentry 结构,通常情况下一个 struct dentry 对应一个 struct inode,也有少数情况下多个 struct dentry 对应一个 struct inode(如硬链接)。struct dentry 中 cache 了更多的文件信息,类如文件名、层次结构,成员 ->d_parent 指向同一块设备内的父节点 struct dentry ,成员 ->d_subdirs 链接了所有的子节点 struct dentry。
多设备的层次化(mount/vfsmount)
上一节描述了单个块设备构建树形文件系统的方式,如果是多个设备怎么样组成一颗更复杂的树呢?
Linux 使用父子树的形式来构造,父设备树中的一个文件夹 struct dentry 可以充当子设备树的挂载点 mountpoint。
- mount/vfsmount
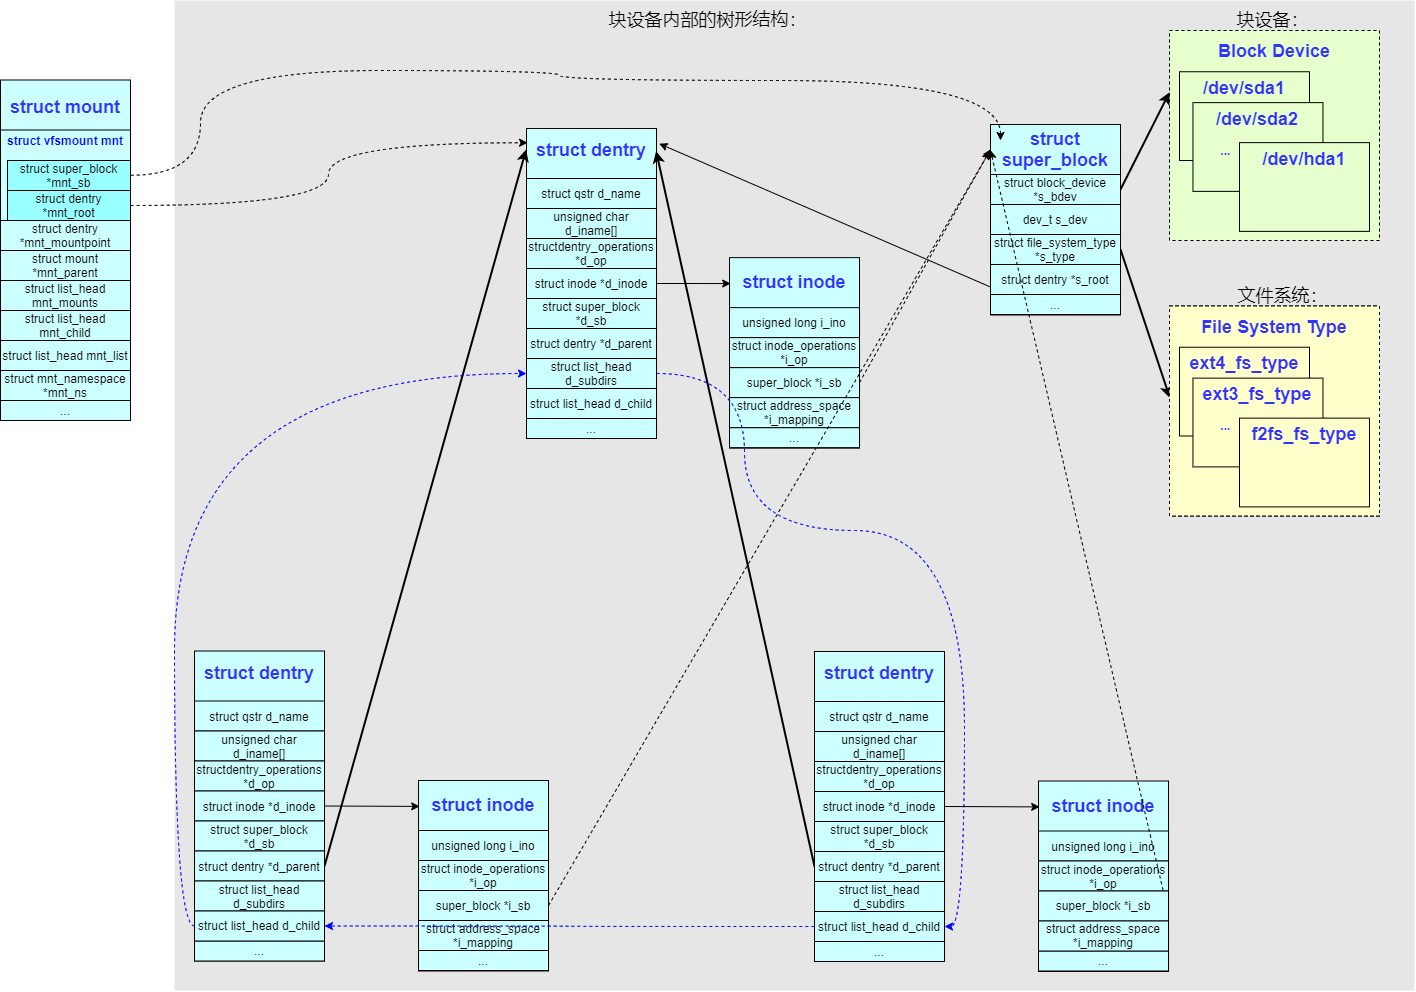
为了组成复杂的父子树,系统定义了一个 struct mount 结构来负责对一个设备内子树的引用。
- mount tree
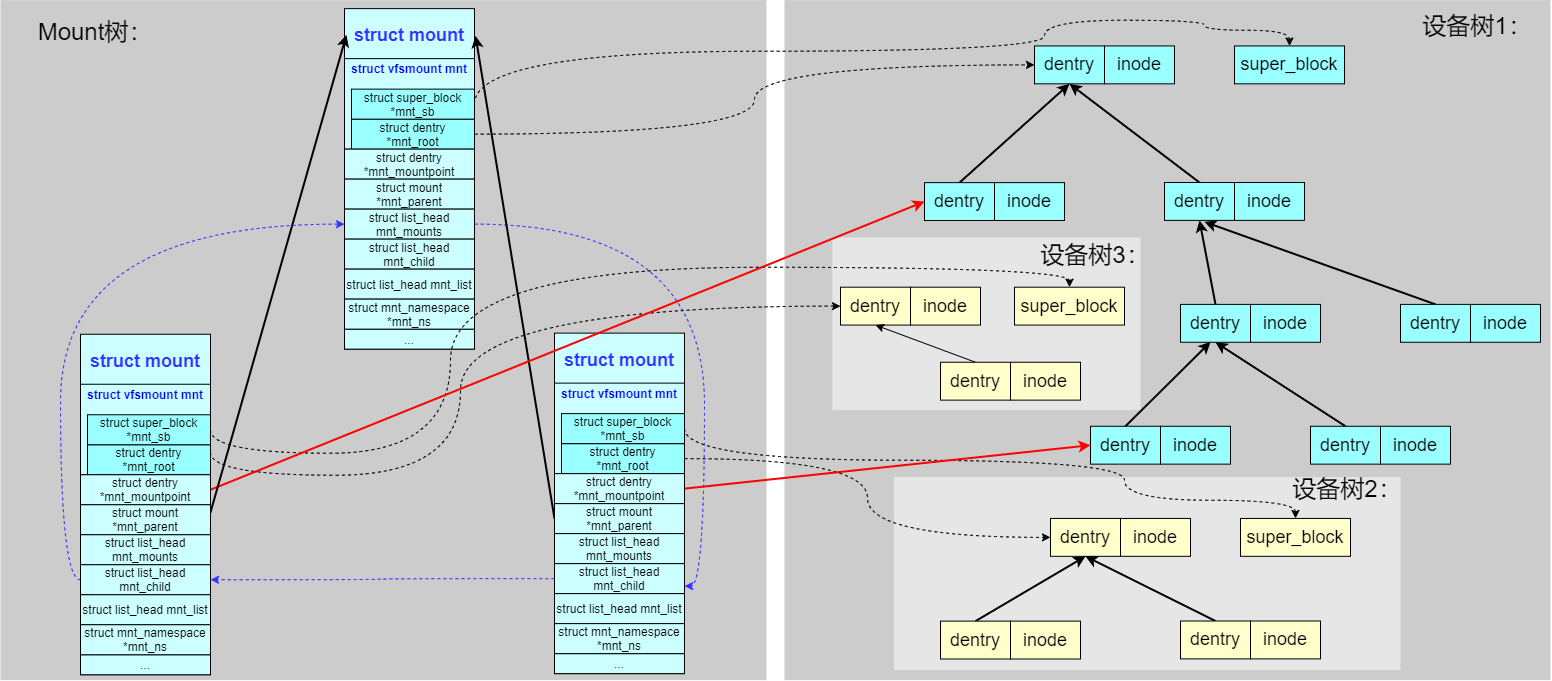
可以看到通过一个 struct mount 结构负责引用一颗子设备树,把这颗子设备树挂载到父设备树的其中一个 dentry 节点上。
如果 dentry 成为了挂载点 mountpoint,会给其标识成 DCACHE_MOUNTED。我们在查找路径的时候同样会判断 dentry 的 DCACHE_MOUNTED 标志,一旦置位就变成了 mountpoint,挂载点文件夹下原有的内容就不能访问了,转而访问子设备树根节点下的内容。
struct mount 结构之间也构成了树形结构。
我们通常使用 mount -t fstpye devname pathname 命令来进行挂载子设备的操作。Linux 拥有非常灵活的挂载规则:
规则1、一个设备可以被挂载多次:
可以看到同一个子设备树,同时被两个 struct mount 结构所引用,被挂载到父设备树的两处不同的 dentry 处。
特别说明:虽然子设备树被挂载两次并且通过两处路径都能访问,但子设备的
dentry和inode只保持一份。
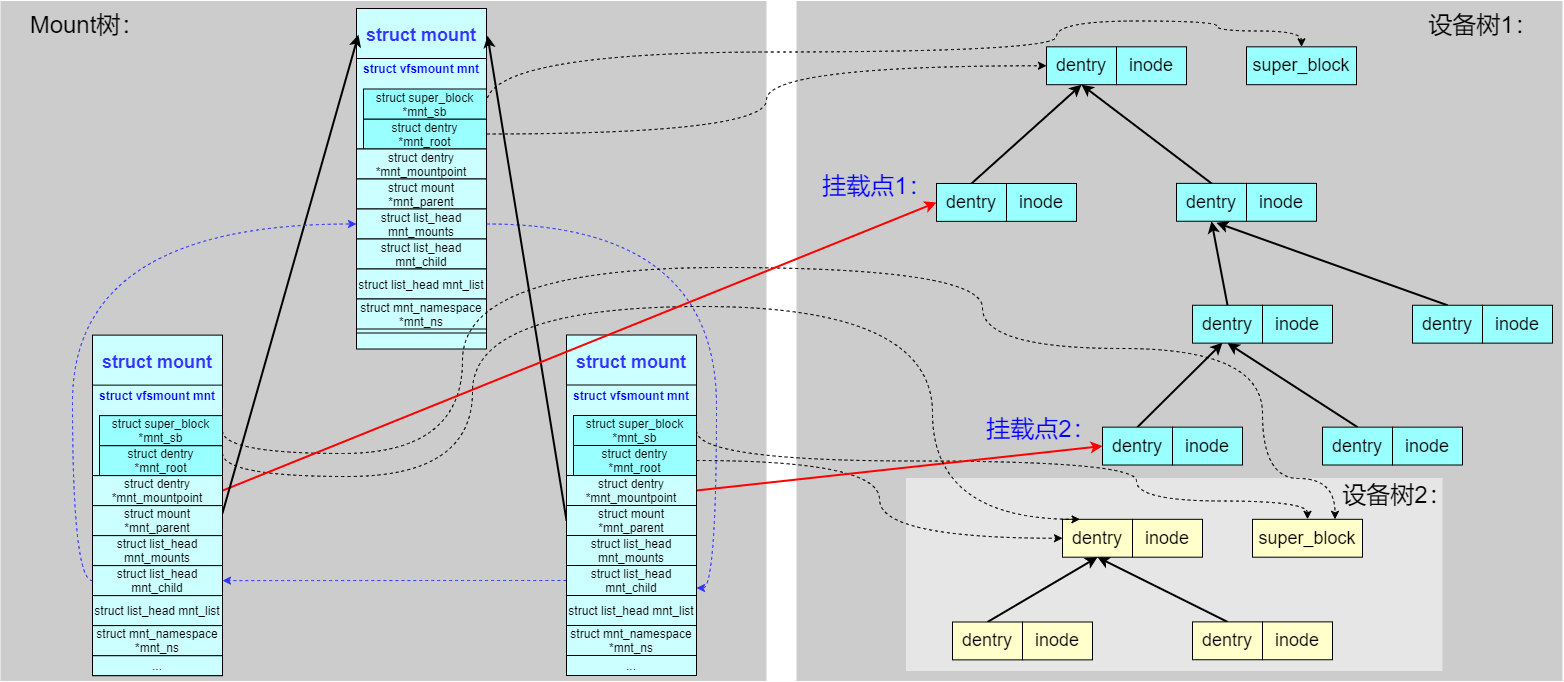
规则2、一个挂载点可以挂载多个设备:
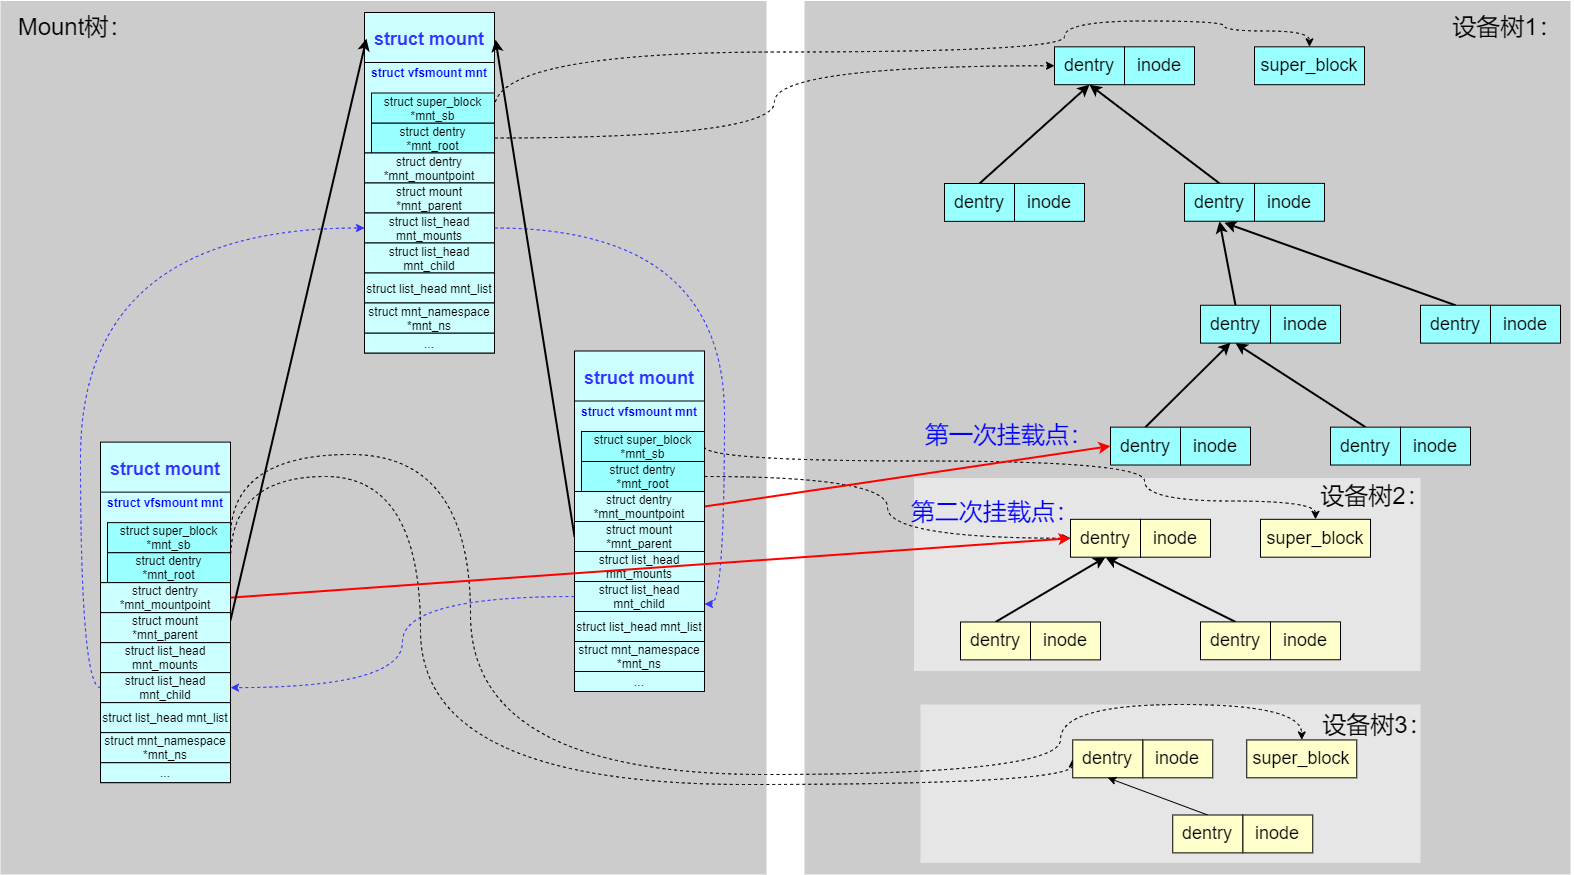
还可以对父设备树的同一个文件夹 dentry 进行多次挂载,最后路径查找时生效的是最后一次挂载的子设备树。
- path
因为 Linux 提供的灵活的挂载规则,所以我们如果要标识一个路径 struct path 的话需要两个元素:vfsmount 和 dentry。
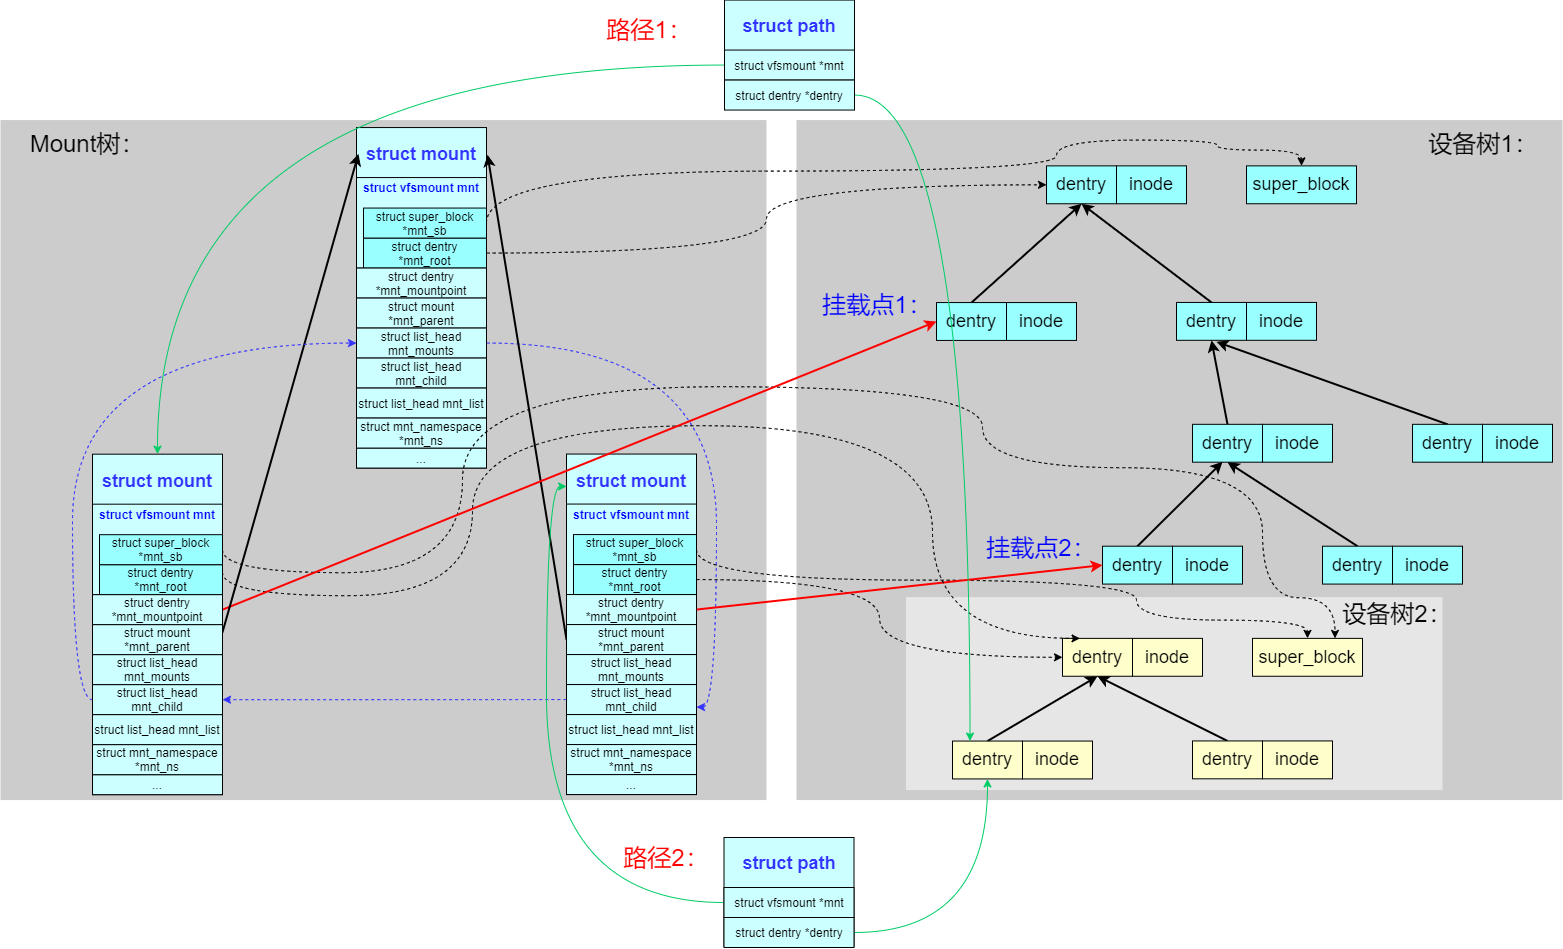
可以看到两个路径 struct path 最后引用到了同一 inode,但是路径 path 是不一样的,因为 path 指向的 vfsmount 是不一样的。
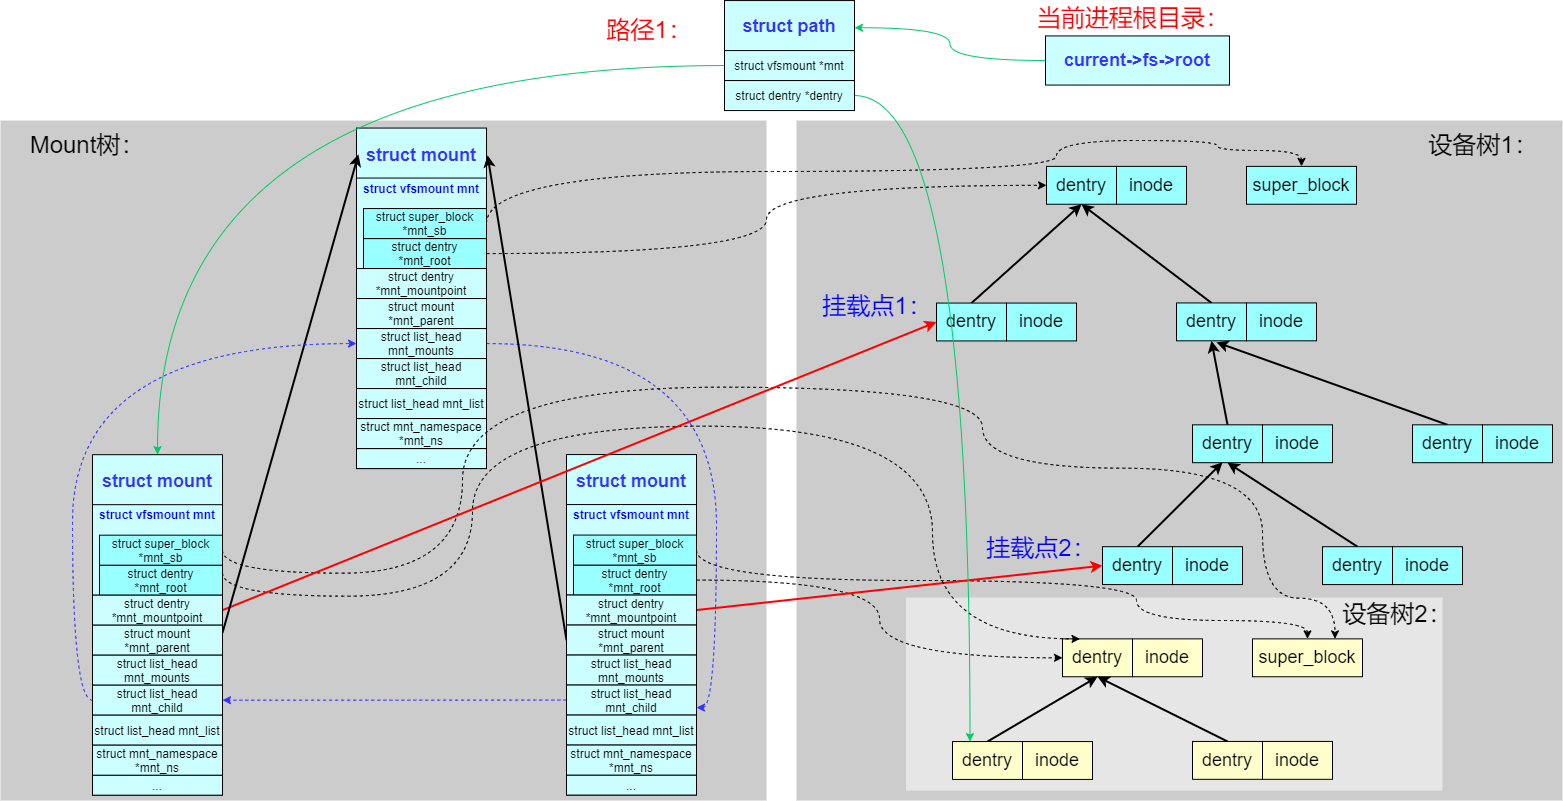
- chroot
Linux 还支持每个进程拥有不同的根目录,使用 chroot() 系统调用可以把当前进程的根目录设置为整棵文件系统树中的任何 path。
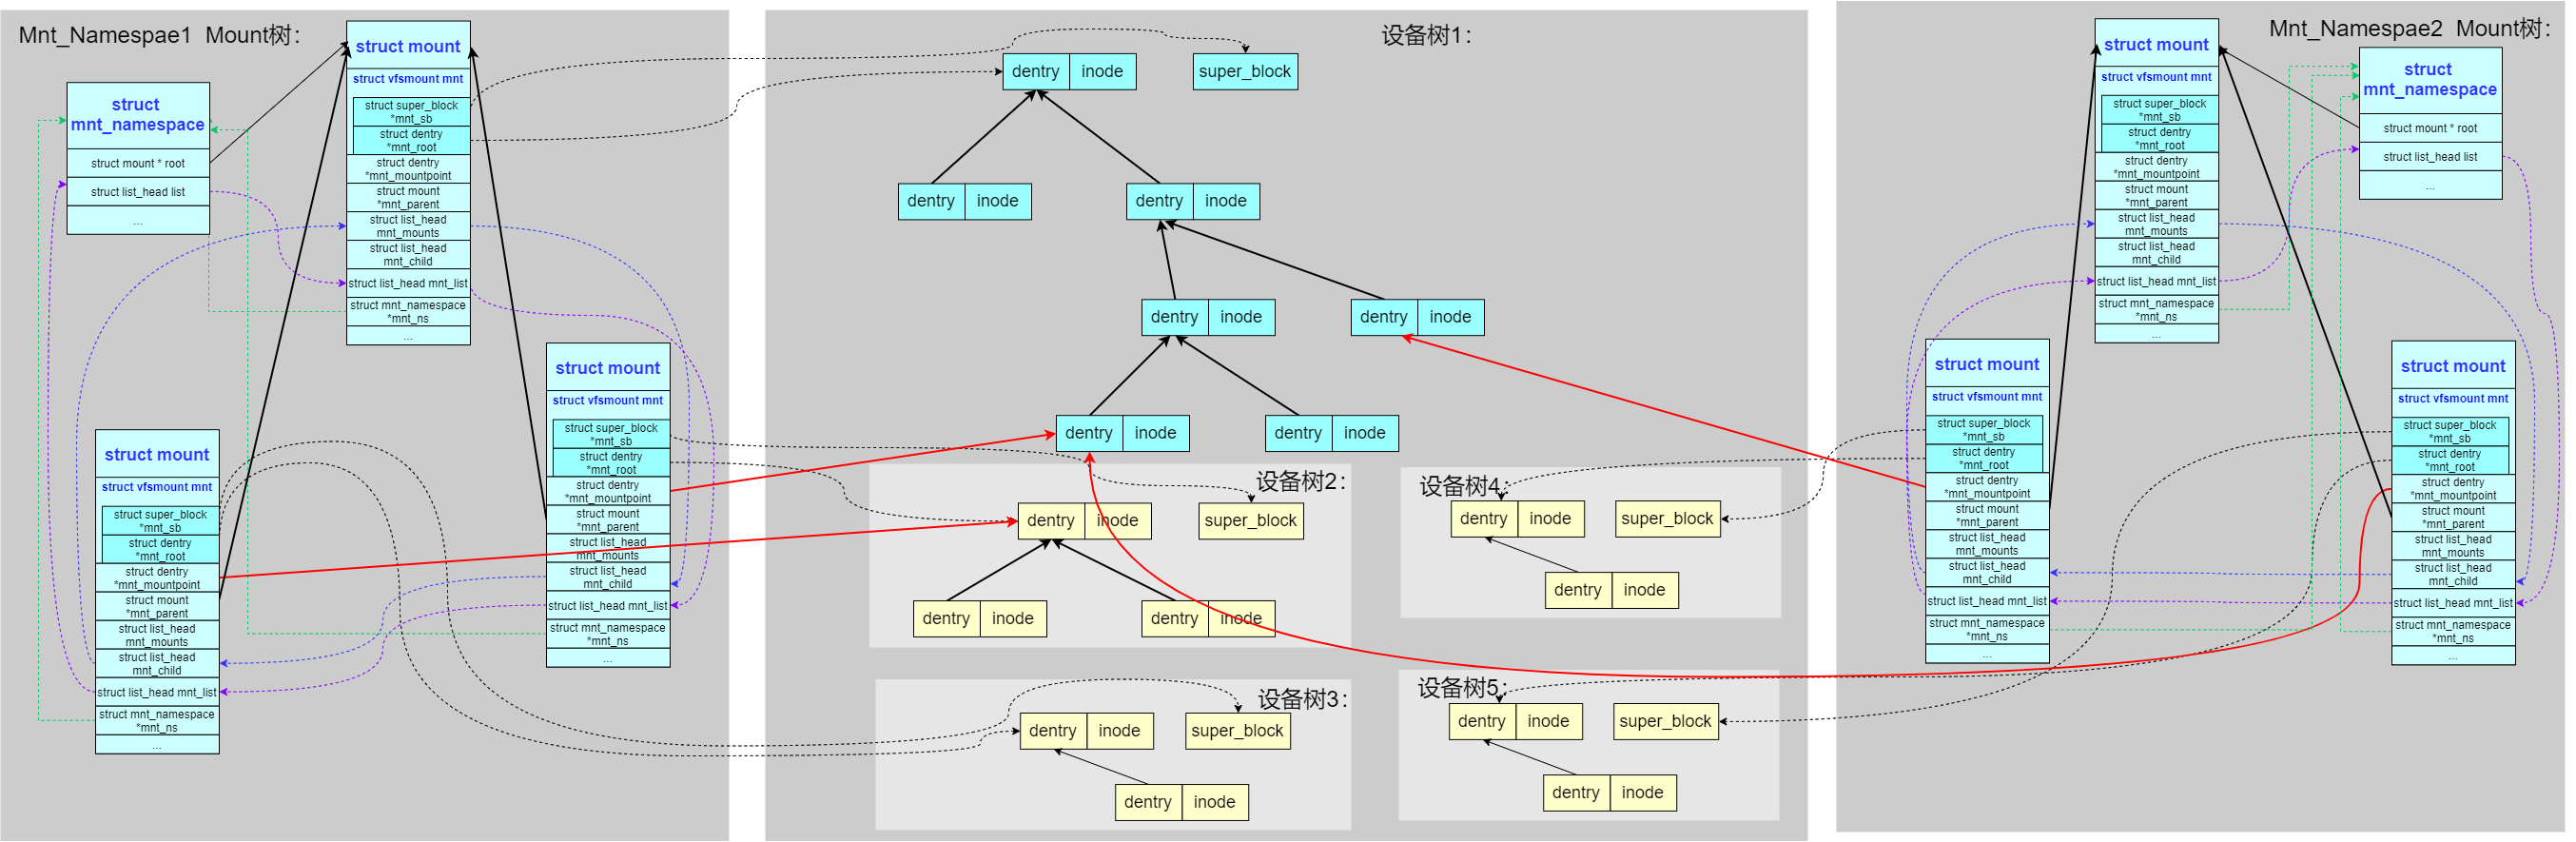
多名空间的层次化(mnt_namespace)
之前的系统中只有一棵 mount 树,为了支持 mnt_namespace,系统把 mount 树扩展成了多棵。每个 mnt_namespace 拥有一棵独立的 mount 树:
关键代码
mount()
mount() 系统调用是理解文件系统层次化的核心,它主要包含3个关键步骤:
1、解析 mount() 系统调用中的参数挂载点路径 pathname ,返回对应的 struct path 结构:
SYSCALL_DEFINE5(mount) → do_mount() → user_path() → user_path_at_empty() → filename_lookup() → path_lookupat() → link_path_walk() → walk_component() → follow_managed()
2、解析 mount() 系统调用中的参数文件系统类型 -t type 和设备路径 devname ,建立起子设备的树形结构(如果之前已经创建过引用即可),建立起新的 struct mount 结构对其引用:
SYSCALL_DEFINE5(mount) → do_mount() → do_new_mount() → vfs_kern_mount() → mount_fs() → type->mount()
3、将新建立的 struct mount 结构挂载到查找到的 struct path 结构上:
SYSCALL_DEFINE5(mount) → do_mount() → do_new_mount() → do_add_mount() → graft_tree() → attach_recursive_mnt() → commit_tree()
chroot()
更改当前进程的根目录:
SYSCALL_DEFINE1(chroot, const char __user *, filename)
{
	struct path path;
	int error;
	unsigned int lookup_flags = LOOKUP_FOLLOW | LOOKUP_DIRECTORY;
retry:
	/* (1) 解析指定的路径,返回对应的`struct path`结构 */
	error = user_path_at(AT_FDCWD, filename, lookup_flags, &path);
	if (error)
		goto out;

	error = inode_permission(path.dentry->d_inode, MAY_EXEC | MAY_CHDIR);
	if (error)
		goto dput_and_out;

	error = -EPERM;
	if (!ns_capable(current_user_ns(), CAP_SYS_CHROOT))
		goto dput_and_out;
	error = security_path_chroot(&path);
	if (error)
		goto dput_and_out;

	/* (2) 把`struct path`结构设置为当前进程的根目录 */
	set_fs_root(current->fs, &path);
	error = 0;
dput_and_out:
	path_put(&path);
	if (retry_estale(error, lookup_flags)) {
		lookup_flags |= LOOKUP_REVAL;
		goto retry;
	}
out:
	return error;
}

↓

void set_fs_root(struct fs_struct *fs, const struct path *path)
{
	struct path old_root;

	path_get(path);
	spin_lock(&fs->lock);
	write_seqcount_begin(&fs->seq);
	old_root = fs->root;
	/* (2.1) 替换新的根目录 */
	fs->root = *path;
	write_seqcount_end(&fs->seq);
	spin_unlock(&fs->lock);
	if (old_root.dentry)
		path_put(&old_root);
}
copy_mnt_ns()
在进程创建或者 unshare()/setns() 系统调用时,如果设置了 CLONE_NEWNS 标志会调用 copy_mnt_ns() 创建一个新的 mnt namespace。其中的核心是创建一颗新的 struct mount 树,首先把旧的 struct mount 树复制过来:
SYSCALL_DEFINE1(unshare) → unshare_nsproxy_namespaces() → create_new_namespaces() → copy_mnt_ns() → copy_tree() → clone_mnt()
随后如果有新的 mount() 动作,两棵树的内容就会不同。
参考文档
猜你喜欢:
- 我要投稿:发表原创技术文章,收获福利、挚友与行业影响力
- 知识星球:独家 Linux 实战经验与技巧,订阅「Linux知识星球」
- 视频频道:泰晓学院,B 站,发布各类 Linux 视频课
- 开源小店:欢迎光临泰晓科技自营店,购物支持泰晓原创
- 技术交流:Linux 用户技术交流微信群,联系微信号:tinylab
| 支付宝打赏 | 微信打赏 | |
 |  请作者喝杯咖啡吧 |  |