

[置顶] Linux Lab v1.2 升级部分内核到 v6.3.6,升级部分 QEMU 版本到 v8.0.2,新增 nolibc 和 NOMMU 开发支持,另有新增 4 款虚拟开发板:ppc/ppce500, arm/virt, loongarch/virt 和 s390x/s390-ccw-virtio。Linux Lab 发布 v1.2 正式版,新增 4 款虚拟开发板,支持 LoongArch, Linux v6.3.6 和 QEMU v8.0.2
如何用 gdb 调试多任务程序
分析 libvirt 启动 qemu 过程
Zhizhou Tian 创作于 2019/05/14
Zhizhou Tian May 01, 2019
背景介绍
gdb 调试多任务程序时会有些麻烦: fork 之后没法同时跟踪父进程和子进程,如果在子进程里设置了一个 breakpoint,那么子进程将会收到一个 SIGTRAP 信号并退出。gdb 手册里提到了一种小技巧,那就是在想要插入 breakpoint 的位置添加 sleep() 调用。但经过笔者试验,添加以下代码更加适合:
static volatile int hold = 1;
while (hold) ;
然后,重新编译程序并执行。这样,当程序运行到 while 位置的时候就会循环在那里,接下来就可以调试了。
调试步骤
多任务基本调试步骤如下:
ps -ef | grep xxx,找到你关心的进程- gdb attach pid,关联到当前 pid 对应的 program
info threads,查看哪个线程正在执行你关心的 paththread xx,切换到那个线程set hold=0,设置 hold 为 0,使程序继续运行。
如果发生了进程间通信,数据流从 A 发送往 B 了,此时便可以采取上述方法,同时跟踪 A 和 B。每次发生了 pipe/socket 通信,就重复上述步骤。通过这种方式,一些很复杂的多任务程序也可以清晰调试。
调试案例
Libvirt 是用于管理虚拟化平台的开源的 API,后台程序和管理工具。它可以用于管理 KVM、Xen、VMware ESX,QEMU 和其他虚拟化技术。
接下来以 libvirt 的分析过程为例来介绍 gdb 的多任务调试。
libvirt 的基本操作和大概结构是这样的:
libvirt 组件有一个 shell,被称为 virsh,提供类似 shell 的界面,可以输入 start、shutdown 等命令操作虚拟机
- libvirt 有一个守护进程,libvirtd,其对 virsh 的命令做出响应
- 以 non-root 执行
virsh start时,将以qemu://session的方式运行。libvirtd 将启动一个 non-root 的子进程来与 virsh 进行 socket 通信 - 以 root 执行
virsh start时,将以qemu://system方式运行,libvirtd 直接与 virsh 进行 socket 通信
- 以 non-root 执行
无论是上述哪种方式,都会创建多个(一般16个)线程,该线程的的作用是将 socket 传递过来的各个命令和配置进行解析,最终形成一个 cmd。
- 子线程会将 cmd 通过 pipe 传递给 libvirtd,libvirtd 会 fork 出一个子进程,并 exec cmd
但如果我们想弄清楚 virsh 启动 qemu 的全过程的细节,即在 virsh 里敲入 start xxx_domain,到 exec qemu bin,这中间究竟发生了什么细节呢?这就必须要 gdb 调试了。可以想象,这过程中必定有大量的进程间通信(socket、pipe),这时就出现了文章开头说明的问题:当前 thread 将数据流发给了另外的 thread,而另外的 thread 却没法跟踪并停止。
我们通过 log 大概知道了
qemuProcessStart是启动的必经之路,因此在这个函数里添加代码:int qemuProcessStart(virConnectPtr conn, unsigned int flags) { ... static volatile int hold = 1; while (hold) ; }重新编译、安装、重启 libvirtd
 # make && make install
 # service libvirtd restart
跟踪 libvirtd
 # ps -ef | grep libvirtd
 root     16529     1  0 16:34 ?        00:00:00 /usr/local/sbin/libvirtd --listen

 # gdb  /usr/local/sbin/libvirtd 16529
在其他的 console 里启动虚拟机
# virsh start xxx按下 Ctrl+c 停止 gdb,查看所有 threads:
 (gdb) info threads
   Id   Target Id         Frame
   15   Thread 0x7f915bccd700 (LWP 16531) "libvirtd" 0x00007f9156ba3296 in qemuProcessStart (conn=conn@entry=0x7f914c1056e0, flags=flags@entry=1)
 ...
 * 1    Thread 0x7f916325d840 (LWP 16529) "libvirtd" 0x00007f9160c0ca4d in poll () from /lib64/libc.so.6
 (gdb)
切换到 thread 15,set hold=0
 (gdb) thread 15
 [Switching to thread 15 (Thread 0x7fb9ac921700 (LWP 27260))]
 #0  qemuProcessStart (conn=conn@entry=0x7fb97c000aa0, driver=driver@entry=0x7fb99c00da90, vm=vm@entry=0x7fb99c00b910, updatedCPU=updatedCPU@entry=0x0,
     asyncJob=asyncJob@entry=QEMU_ASYNC_JOB_START, migrateFrom=migrateFrom@entry=0x0, migrateFd=migrateFd@entry=-1, migratePath=migratePath@entry=0x0,
     snapshot=snapshot@entry=0x0, vmop=vmop@entry=VIR_NETDEV_VPORT_PROFILE_OP_CREATE, flags=flags@entry=1) at qemu/qemu_process.c:5878
 5878        while (hold)
 (gdb) set hold=0
接下来就可以继续调试下去了。
通过这种办法就可以得知整个过程。以下是通过重复上述步骤获取到的知识:
子线程将 cmd 通过 pipe 传递给 libvirtd
  (gdb)
  #0  virCommandHandshakeNotify (cmd=cmd@entry=0x7f6e4400fa40) at util/vircommand.c:2757
  #1  0x00007f6e5e7666cd in qemuProcessLaunch (conn=conn@entry=0x7f6e500009a0, driver=driver@entry=0x7f6e54000e80, vm=vm@entry=0x7f6e54012ec0,
      asyncJob=asyncJob@entry=QEMU_ASYNC_JOB_START, incoming=incoming@entry=0x0, snapshot=snapshot@entry=0x0, vmop=vmop@entry=VIR_NETDEV_VPORT_PROFILE_OP_CREATE,
      flags=flags@entry=17) at qemu/qemu_process.c:5685


  2729 int virCommandHandshakeNotify(virCommandPtr cmd)
  ...
  2749     if (safewrite(cmd->handshakeNotify[1], &c, sizeof(c)) != sizeof(c)) {
  2750         virReportSystemError(errno, "%s", _("Unable to notify child process"));
  2751         VIR_FORCE_CLOSE(cmd->handshakeNotify[1]);
  2752         return -1;
  2753     }
  ...
  2756 }
libvirtd 收到 cmd 后,会执行 virExec,
  #0  virExec (cmd=cmd@entry=0x7f72bc0026d0) at util/vircommand.c:491
  #1  0x00007f72d2219b07 in virCommandRunAsync (cmd=cmd@entry=0x7f72bc0026d0, pid=pid@entry=0x0) at util/vircommand.c:2452
  #2  0x00007f72d221a0c4 in virCommandRun (cmd=cmd@entry=0x7f72bc0026d0, exitstatus=exitstatus@entry=0x7f72c29fab64) at util/vircommand.c:2284
  #3  0x00007f72d222c166 in virFirewallCheckUpdateLock (lockflag=lockflag@entry=0x7f72d26768a3 <iptablesUseLock>, args=args@entry=0x7f72c29fabc0) at util/virfirewall.c:124
  ...
  #20 0x00007f72d072035d in clone () from /lib64/libc.so.6
virExec() 将会 fork 出子进程,子进程将会执行 exec(qmeu-system-x86_64)
  475 virExec(virCommandPtr cmd)
  ...
  749      if (cmd->uid != (uid_t)-1 || cmd->gid != (gid_t)-1 || cmd->capabilities || (cmd->flags & VIR_EXEC_CLEAR_CAPS)) {
  753         if (virSetUIDGIDWithCaps(cmd->uid, cmd->gid, groups, ngroups,
  ...
  790     if (cmd->env)
  791         execve(binary, cmd->args, cmd->env); <--- 启动了qemu
  ...
在执行了 execve 之后,当前父进程就会结束退出了。如果想要继续跟踪子进程 qemu,那么仍然需要重复上述过程。
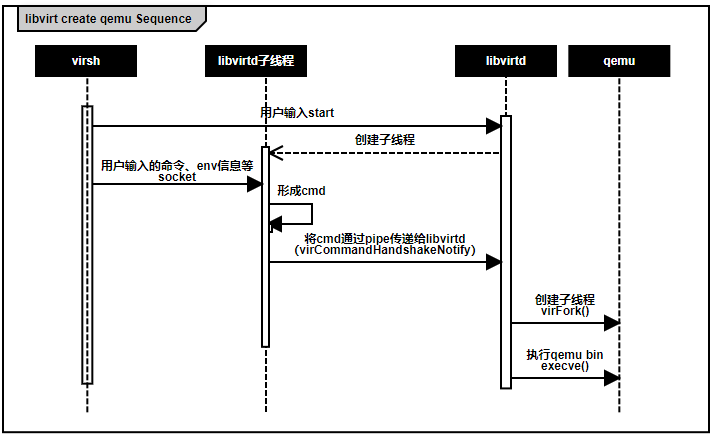
libvirt 分析小结
我们以一张流程图来展示整个 libvirt 启动 qemu 的过程
抛砖引玉
在 Windows 调试工具 windbg 上,用户可以选择子进程在创建后,wait 并等待用户调试,从而省去了上述麻烦。gdb 是不是可以引入这个特性呢?
附录
On most systems, GDB has no special support for debugging programs which create additional processes using the fork function. When a program forks, GDB will continue to debug the parent process and the child process will run unimpeded. If you have set a breakpoint in any code which the child then executes, the child will get a SIGTRAP signal which (unless it catches the signal) will cause it to terminate.
However, if you want to debug the child process there is a workaround which isn’t too painful. Put a call to sleep in the code which the child process executes after the fork. It may be useful to sleep only if a certain environment variable is set, or a certain file exists, so that the delay need not occur when you don’t want to run GDB on the child. While the child is sleeping, use the ps program to get its process ID. Then tell GDB (a new invocation of GDB if you are also debugging the parent process) to attach to the child process (see Attach). From that point on you can debug the child process just like any other process which you attached to.
猜你喜欢:
- 我要投稿:发表原创技术文章,收获福利、挚友与行业影响力
- 知识星球:独家 Linux 实战经验与技巧,订阅「Linux知识星球」
- 视频频道:泰晓学院,B 站,发布各类 Linux 视频课
- 开源小店:欢迎光临泰晓科技自营店,购物支持泰晓原创
- 技术交流:Linux 用户技术交流微信群,联系微信号:tinylab
| 支付宝打赏 ¥9.68元 | 微信打赏 ¥9.68元 | |
 |  请作者喝杯咖啡吧 |  |
Read Album:
- LSM Oops 内存错误根因分析与解决
- Linux 下的 Sync 卡死问题分析报告
- 使用 mtrace 分析 “内存泄漏”
- 七张图看懂 Linux profiling 机制
- 探索从 vmlinux 中抓取 Linux 内核 config 文件